Sharp EL-9900 EL9900 Operation Manual - Page 96
Graphing Polar Equations
 |
UPC - 074000016880
View all Sharp EL-9900 manuals
Add to My Manuals
Save this manual to your list of manuals |
Page 96 highlights
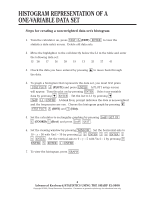
GRAPHING POLAR EQUATIONS Steps for graphing a polar function: 1. Turn the calculator on and press 2ndF SET UP E (COORD) 3 (Polar) to change to polar mode. While in the SET UP menu, the calculator should be setup in radian mode. To complete this setup, press B (DRG) 2 (Rad). Press 2ndF QUIT to exit the SET UP menu. 2. Make sure calculator is in connected mode by pressing 2ndF DRAW D (LINE) ENTER . The first option should be reflected for R1. Set the calculator to display polar coordinates when tracing, by pressing 2ndF FORMAT F (CURSOR) and 2 (PolarCoord). Also, set the calculator to display the expression during tracing by pressing B (EXPRESS) 1 (ON). Press 2ndF QUIT to exit the FORMAT menu. 3. Press Y= to access the R1 prompt. Press CL to remove an old R1 expression. Press ENTER CL to clear additional R prompts. 4. Enter the polar function r = 2(1 - cos θ) for R1, by pressing 2 ( 1 - cos X/θ/T/n ) . Notice, when in polar mode the X/θ/T/n key provides a θ for equation entry. 5. Now, graph the polar function in the Decimal viewing window by pressing ZOOM A (ZOOM) 7 (Dec). 6. This particular shape of curve is called a cardoid. Trace the curve by pressing TRACE . Notice the expression is displayed at the top of the screen. 21 Advanced Keyboard/CALCULUS USING THE SHARP EL-9900 Copyright © 2002, Sharp Electronics Corporation. Permission is granted to photocopy for educational use only.
-
 1
1 -
2
-
3
-
4
-
5
-
6
-
7
-
8
-
9
-
10
-
11
-
12
-
13
-
14
-
15
-
16
-
17
-
18
-
19
-
20
-
21
-
22
-
23
-
24
-
25
-
26
-
27
-
28
-
29
-
30
-
31
-
32
-
33
-
34
-
35
-
36
-
37
-
38
-
39
-
40
-
41
-
42
-
43
-
44
-
45
-
46
-
47
-
48
-
49
-
50
-
51
-
52
-
53
-
54
-
55
-
56
-
57
-
58
-
59
-
60
-
61
-
62
-
63
-
64
-
65
-
66
-
67
-
68
-
69
-
70
-
71
-
72
-
73
-
74
-
75
-
76
-
77
-
78
-
79
-
80
-
81
-
82
-
83
-
84
-
85
-
86
-
87
-
88
-
89
-
90
-
 91
91 -
 92
92 -
 93
93 -
 94
94 -
 95
95 -
 96
96 -
 97
97 -
 98
98 -
 99
99 -
 100
100 -
 101
101 -
102
-
103
-
104
-
105
-
106
-
107
-
108
-
109
-
110
-
111
-
112
-
113
-
114
-
115
-
116
-
117
-
118
-
119
-
120
-
121
-
122
-
123
-
124
-
125
-
126
-
127
-
128
-
129
-
130
-
131
-
132
-
133
-
134
-
135
-
136
-
137
-
138
-
139
-
140
-
141
-
142
-
143
-
144
-
145
-
146
-
147
-
148
-
149
-
150
-
151
-
152
-
153
 |
 |
