Sharp EA224WMi-BK User Manual - Page 8
Quick Start
 |
View all Sharp EA224WMi-BK manuals
Add to My Manuals
Save this manual to your list of manuals |
Page 8 highlights
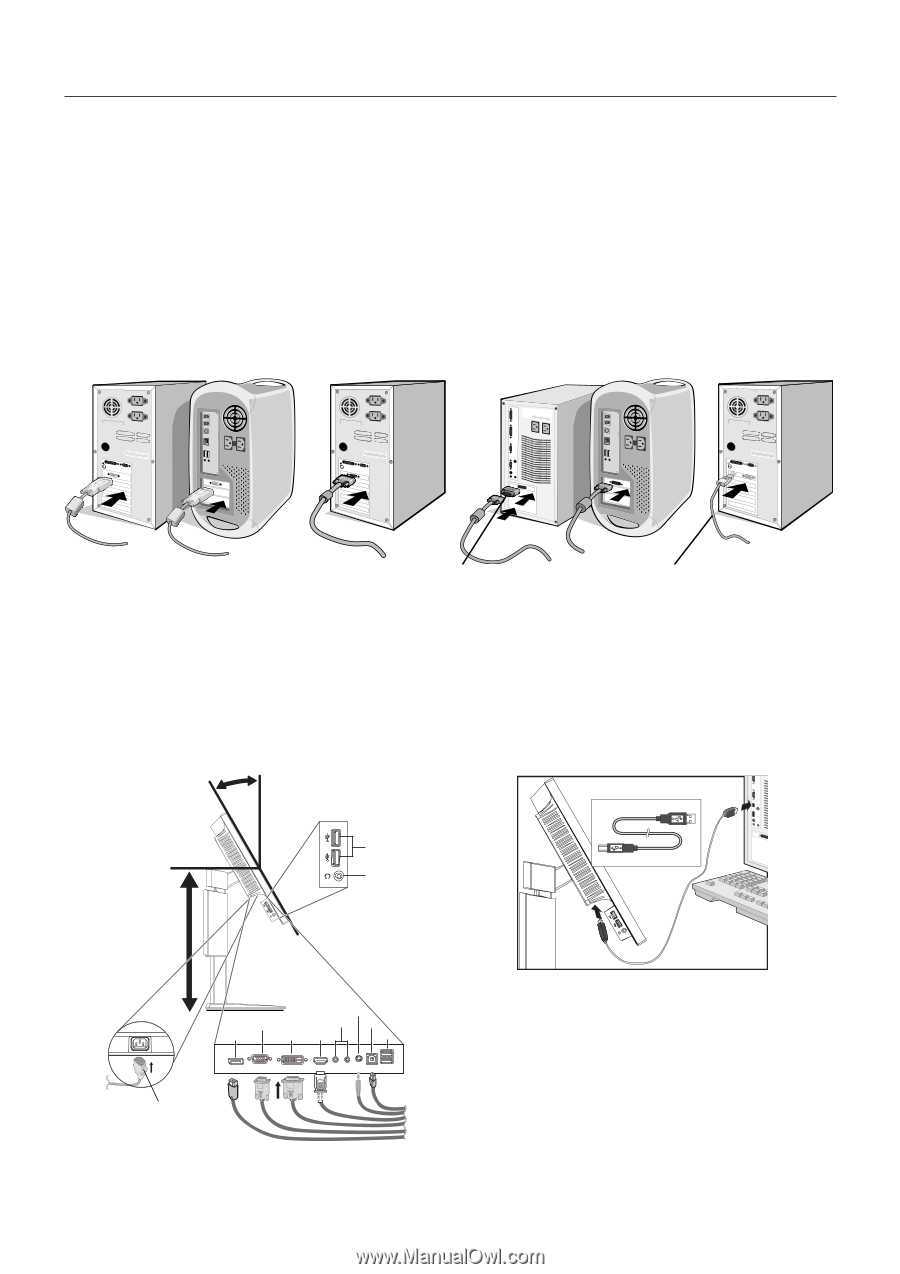
Quick Start To connect the LCD monitor to your system, follow these instructions: NOTE: Make sure to read "Recommended Use" (page 3) before installation. The accessories included will depend on the where the LCD monitor is to be shipped. 1. Turn off the power of your computer. 2. For a PC or MAC with DVI digital output: Connect the DVI signal cable to the connector of the display card in your system (Figure A.1). Tighten all screws. For a PC with Analog output: Connect a 15-pin mini D-SUB signal cable to the connector of the display card in your system (Figure A.2). For a MAC: Connect a Macintosh cable adapter to the computer, then attach the 15-pin mini D-SUB signal cable to the Macintosh cable adapter (Figure A.3). NOTE: Some Macintosh systems do not require any Macintosh cable adapter. For a PC with DisplayPort output: Connect the DisplayPort cable to the connector of the display card in your system (Figure A.4). Figure A.1 Macintosh Cable Figure A.2 Adapter Figure A.3 DisplayPort cable Figure A.4 NOTE: 1. Please use a DisplayPort cable with DisplayPort logo. 2. When removing the DisplayPort cable, hold down the top button to release the lock. 3. Place hands on each side of the monitor to tilt the LCD panel 30-degree angle and lift up to the highest position. 4. Connect all cables to the appropriate connectors (Figure C.1). When using the USB cable, connect the B type connector to the USB upstream port on the right back side of the monitor and the A type connector to the downstream port on the computer (Figure C.1a). If using the cord from a USB device, plug into one of the downstream ports of the monitor. NOTE: Incorrect cable connections may cause abnormal operation, damage display quality/components of LCD module and/ or shorten the module's life. 30° Tilt A Type A Type Highest Stand Position USB Downstream Headphone B Type B Type Audio Input D-SUB ControlSync IN/OUT* USB Upstream DisplayPort DVI HDMI USB Downstream Power cord Figure C.1a NOTE: Adjustment of the volume control as well as the equalizer to other settings than the center position may increase the ear-/headphones output voltage and therefore the sound pressure level. *: See page 23 Figure C.1 English-6
-
 1
1 -
2
-
 3
3 -
 4
4 -
 5
5 -
 6
6 -
 7
7 -
 8
8 -
 9
9 -
 10
10 -
 11
11 -
 12
12 -
 13
13 -
14
-
15
-
16
-
17
-
18
-
19
-
20
-
21
-
22
-
23
-
24
-
25
-
26
 |
 |