Sanyo PLCXF60 Instruction Manual, PLC-XF60 Advanced Screen Manager - Page 8
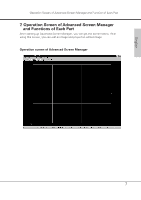
Part names and functions, Operation Screen of Advanced Screen Manager and Function of Each Part
 |
View all Sanyo PLCXF60 manuals
Add to My Manuals
Save this manual to your list of manuals |
Page 8 highlights
Operation Screen of Advanced Screen Manager and Function of Each Part Toolbar icon q w e r t y u i o !0 !1 !2 Part names and functions File(F) Save and administrate the edited data or execute the edited date. Menu Item The No. is Toolbar icon No. Function (Page) New document (N) Create a new file. Open (O) Open the stored file. Save (S) q Save the edited data. Save as a new file (A) Save the edited data after giving a name. Send (T) w The end of application(X) Convert the adjusted data to binary data and send it to Warp&Blending board of the projector. Terminate Advanced Screen Manager. Type (T) Selecting a type of editing. Menu Item The No. is Toolbar icon No. Function (Page) Spherical (S) e Edit to project on the spherical screen. (p17) Horizontal curve (H) r Vertical curve (Z) t Keystone (K) y Grid [New] (G) u Grid [transition] (I) i Blending (B) Blending 2Step(T) o Edit to project on the horizontally curved screen.(p19) Edit to project on the vertically curved screen. (p20) Edit the keystone distortion. (p21) Edit the grid. (p22) Correct the grid after editing any of "Spherical correction", "Horizontal curve" "Vertical curve", "Keystone". (p23) Select the blending Step. (p24) Set the 2Step Blending area and offset figure. (p25) Blending 16Step(S) !0 Set the 16Step Blending area and offset figure. (p26) 8
-
 1
1 -
2
-
 3
3 -
 4
4 -
 5
5 -
 6
6 -
 7
7 -
 8
8 -
 9
9 -
 10
10 -
 11
11 -
 12
12 -
 13
13 -
14
-
15
-
16
-
17
-
18
-
19
-
20
-
21
-
22
-
23
-
24
-
25
-
26
-
27
-
28
-
29
-
30
-
31
-
32
-
33
-
34
 |
 |
