Sanyo FWBP706F Quick Start Guide - Page 1
Sanyo FWBP706F Manual
 |
View all Sanyo FWBP706F manuals
Add to My Manuals
Save this manual to your list of manuals |
Page 1 highlights
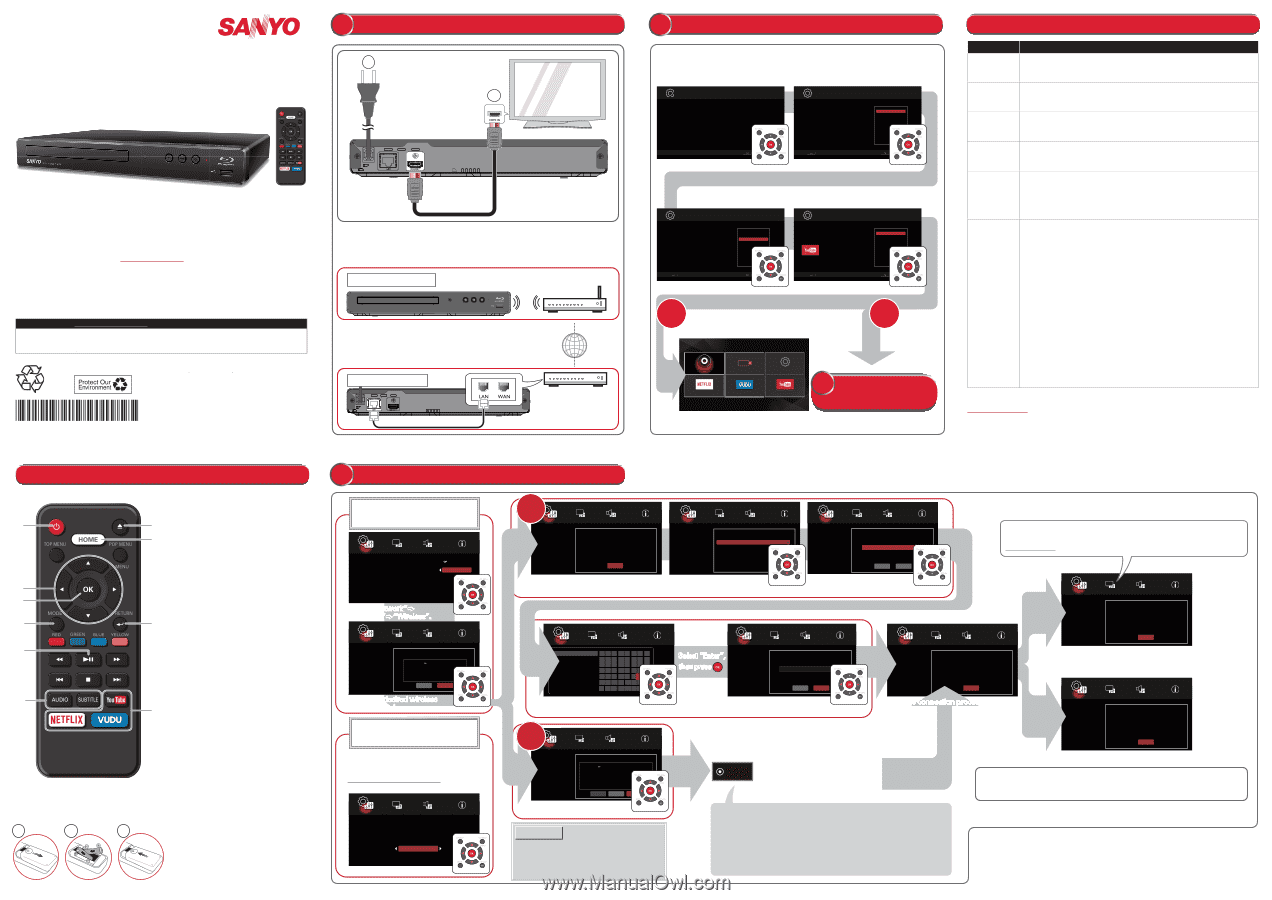
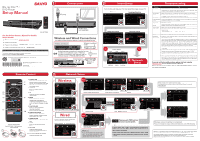
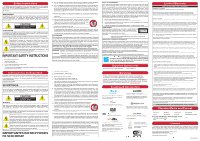
Blu-ray Disc™ / DVD Player Setup Manual 1 Connections 2 AC plug 1 FWBP706F See the Online Owner's Manual for details: sanyo-av.com 1 Please visit website sanyo-av.com 2 Select Download. 3 Type in the Model # "FWBP706F" and click "Search". 4 Select the Manual and click on "Download". Register Online at sanyo-av.com/support/ today to get the most benefits from your purchase. Registering your model with SANYO makes you eligible for all of the valuable benefits such as software upgrades and important product notifications. Register Online at sanyo-av.com/support/ For product recycling information, please visit - sanyo-av.com Click on *2VMN00250* © 2016 Funai Electric Co., Ltd. Printed in China ECR01UH 2VMN00250 HDMI cable (not supplied) Wireless and Wired Connections You need to configure network settings in order to use Internet services. Wireless Connection Wireless broadband router Active Internet connection is required to your or modem or broadband router. If there is trouble connecting to the Internet, refer to relevant topics in TROUBLESHOOTING. Internet Wired Connection LAN cable (not supplied) Modem or Router 2 Initial Setup Turn On the unit and your TV, then select the input on your TV. Welcome Page: 1/4 Easy Setup Language Selection Page: 2/4 Easy Setup Welcome to the Set up Wizard! This Wizard will go through the initial set up of this BD Player. For detail settings, please visit the Home Menu after this set up is completed. Language Setting Choose OSD language for all OSD windows, menu, etc... English Français Español Next Previous Next HDMI CEC Setting Page: 3/4 Easy Setup HDMI CEC Setting On Off Set up HDMI CEC function. For details, please check the owner's manual. Previous Next Network Setting Page: 4/4 Easy Setup Network Connection Set up By connecting this unit to the Internet, the following functions are available : Set up now Not now To use the above functions, please setup with Network Settings. Previous Next No Yes HOME MENU DISC USB Setup Disc USB Setup Netflix VUDU YouTube NETFLIX VUDU YouTube 3 Network Setup Troubleshooting Problem Tip No power. • Check if the AC power cord is properly connected. • Unplug the AC power cord, and wait for about 5-10 seconds. Plug it back in and attempt to Power On the unit. No sound or • Make sure both the TV and Blu-ray Disc™ player are turned On. picture. • Confirm the connections to the TV are made properly as shown in CONNECTIONS, then select the input on your TV. No reaction • Confirm that the player's AC power cord is plugged into a power outlet. to the remote • Check the batteries in the remote control, and make sure they are control. inserted properly by + or - symbols. No sound • Adjust the volume. or distorted • Make sure the HDMI cable is not plugged into an HDMI-DVI sound. adapter which does not handle Digital sound. Cannot play back a disc. • Make sure that the product supports the disc. • Check the region code of the disc. This unit supports the following region codes. - Blu-ray Disc™: "A" - DVD: "ALL" or "1" • Clean the disc. Cannot • Check to see if the modem / router has Power turned On. connect to • Confirm, if the Internet light is showing activity (light blinking) on the network. the modem / router. • Turn Off this unit and the modem/router (if it has a Power button), then unplug their AC cords. After 30 seconds, plug them back in and turn the devices back On. If you have a telephone / Internet modem with your cable service, then you may have to use its reset button or remove the backup battery to reset this type of modem. Now wait for the lights to show activity and try reconnecting. • Check the cable connections to the router when connecting with a LAN cable. • Confirm the security protocol of the router. WPS (Wi-Fi Proteced Setup) cannot be used if the security protocol is set to "WEP". • If none of the above suggestions fix the issue, please contact your ISP (Internet Service Provider) for further assistance. • Once you have activated the wireless connection, please wait 30 seconds for the connection to be established after turning On the unit, before trying to access network features such as BD-Live™ and the third-party network services. If you do not find a solution above, please visit our website sanyo-av.com for the Online Owner's Manual. Please download it and then refer to "TROUBLESHOOTING" section for more information. Remote Control 1. POWER-ON Press to turn On the unit, or to 1 7 switch the unit into Standby 8 mode. (To completely turn Off the unit, you must unplug the AC power cord.) 2. CURSOR Press to select items or settings. 2 3. OK 3 Press to confirm or select menu items. 4 9 4. MODE During playback, press to display the Play Menu to 5 configure playback functions such as Search, Repeat, Angle, etc. 5. PLAY/PAUSE Press to start playback or 6 resume playback. 10 Press to Pause playback. 6. SUBTITLE/AUDIO Press to select Subtitles or Audio Channel (such as audio languages) on a disc. 7. OPEN/CLOSE Press to Open or Close the disc tray. INSERT BATTERIES Install 2 AAA (1.5V) batteries (not supplied) 1 2 3 8. HOME Press to display the Home Menu. 9. RETURN Press to Return to the previously displayed menu or screen function. 10. YouTube/NETFLIX/VUDU Press to Launch VOD. 3 Network Setup Wireless Setup Network Language Streaming Co... Security System Interface Wireless Setting Network Status Connection Test IP Setting Select "Network"A "Interface"A"Wireless". Ethernet Wireless Setup Network Language Streaming Co... Security System Wireless Setting Scan Manual Auto Exit Next Select the desired wireless setup method. Wired Select "Network"A"Interface"A"Ethernet". Connect a LAN cable, and then configuration will automatically be performed. How to check the connection Select "Network" A "Connection Test". Network Language Streaming Co... Security System Interface Wireless Setting Network Status Connection Test IP Setting More Scan Setup Setup Setup Network Language Streaming Co... Security System Scanning... Cancel The unit automatically searches for nearby wireless access points. Network Language Streaming Co... Security System SSID Security Signal Strength access_point_ access_poi... access_poi... access_poi... access_poi... access_poi... WPA2-PSK WPA-PSK WPA2-PSK WPA2-PSK WPA-PSK WPA2-PSK 100% 100% 100% 100% 100% 100% Select the SSID (wireless access point) to connect to. Network Language Streaming Co... Security System WPA2-PSK _ PreEvxiiotus Next Password entry screen appears. Please verify your settings and try again. For detailed instructions, refer to the Online Owner's manual. sanyo-av.com Setup Setup Setup Setup Network Language Streaming Co... Security System Connection Failed. OK | abc de123 f gh i j 456 Select "Enter", Network k l mno 789 p q r s t . @0 then press Language Streaming Co... WPA2-PSK ********** u v w x y z ABC Back Space Enter Clear Security System PreEvxiiot us Next Network Language Streaming Co... Security System Waiting... Cancel Connection failure message appears. Setup Enter the password of your wireless router. Auto Setup At the confirmation screen, select [Next] to move on. Wireless connection process now starts. Network Language Streaming Co... Security System Connection success and IP is obtained. OK Network Language Streaming Co... Security System WPS(Wi-Fi Protected Setup) PBC PIN Please press Push Button on the Access Point within 120 seconds after you select the "Next" Button below. Refresh Previous Next Select the desired wireless setup method. NOTE(S): • If you are experiencing signal issues with your wireless connection, please confirm that your wireless router is placed close enough to the unit. PBC Please push PBC button on your access point. If your router has a PBC* (Push Button Configuration) button, you can use "PBC" which is the easiest way to set up a wireless connection. If your router does not have it, please use the "Scan" setup. * PBC button may be called WPS button on your wireless router. Connection success message appears. Wireless network setting is completed. You are ready to enjoy network features over Wirelessly! SANYO is a registered trademark of SANYO Electric Co., Ltd. and is used by Funai Electric Co., Ltd. and Funai Corporation, Inc. under license from SANYO Electric Co., Ltd. Any liability related to SANYO products, including design and quality, is the sole responsibility of Funai Electric Co., Ltd. and Funai Corporation, Inc. Please contact Funai Corporation, Inc. for any questions or claims related to SANYO products: sanyo-av.com
-
 1
1 -
 2
2
 |
 |