Samsung WF50A8600AE User Manual - Page 23
Step-by-step installation, STEP 1
 |
View all Samsung WF50A8600AE manuals
Add to My Manuals
Save this manual to your list of manuals |
Page 23 highlights
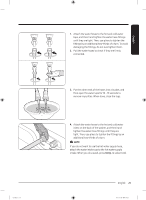
English Step-by-step installation STEP 1 Select a location Location requirements: • A solid, level surface without carpeting or flooring that may obstruct ventilation • No direct sunlight • Adequate room for ventilation and wiring • Ambient temperature always higher than the freezing point (32 °F / 0 °C) • Away from heat sources STEP 2 Remove the shipping bolts Unpack the product package and remove all shipping bolts. 1. Loosen all shipping bolts on the rear of the machine using the spanner. NOTE Use the enclosed end of the supplied wrench to remove the shipping bolts. 2. Fill the holes with the supplied plastic bolt caps. Keep the shipping bolts for future use. WARNING • The shipping bolts secure the tub during product transportation and reduce the chance of suspension damage. Remove the shipping bolts before using the product and only reassemble them back in case you need to move the product. • Packaging materials can be dangerous to children. Dispose all packaging material (plastic bags, polystyrene, etc.) out of children's reach. Untitled-1 23 English 23 2021-02-09 2:17:02
-
 1
1 -
2
-
3
-
4
-
5
-
6
-
7
-
8
-
9
-
10
-
11
-
12
-
13
-
14
-
15
-
16
-
17
-
 18
18 -
 19
19 -
 20
20 -
 21
21 -
 22
22 -
 23
23 -
 24
24 -
 25
25 -
 26
26 -
 27
27 -
 28
28 -
29
-
30
-
31
-
32
-
33
-
34
-
35
-
36
-
37
-
38
-
39
-
40
-
41
-
42
-
43
-
44
-
45
-
46
-
47
-
48
-
49
-
50
-
51
-
52
-
53
-
54
-
55
-
56
-
57
-
58
-
59
-
60
-
61
-
62
-
63
-
64
-
65
-
66
-
67
-
68
-
69
-
70
-
71
-
72
-
73
-
74
-
75
-
76
-
77
-
78
-
79
-
80
-
81
-
82
-
83
-
84
-
85
-
86
-
87
-
88
-
89
-
90
-
91
-
92
-
93
-
94
-
95
-
96
-
97
-
98
-
99
-
100
-
101
-
102
-
103
-
104
-
105
-
106
-
107
-
108
-
109
-
110
-
111
-
112
-
113
-
114
-
115
-
116
-
117
-
118
-
119
-
120
-
121
-
122
-
123
-
124
-
125
-
126
-
127
-
128
-
129
-
130
-
131
-
132
-
133
-
134
-
135
-
136
-
137
-
138
-
139
-
140
-
141
-
142
-
143
-
144
 |
 |
