Samsung NZ30M9880UB/AA Installation Guide - Page 8
Installation instructions, Install cooktop, STEP 3-1
 |
View all Samsung NZ30M9880UB/AA manuals
Add to My Manuals
Save this manual to your list of manuals |
Page 8 highlights
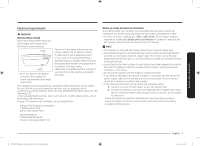
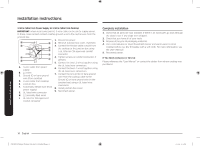
Installation instructions Install cooktop STEP 1 Prepare installation Decide on the final location for the cooktop. Avoid drilling or cutting into house wiring during installation. Bottom of Cooktop 01 Using 2 or more people, place the cooktop upside down on a covered Foam Tape surface using the foam end posts from the packaging. 02 The foam strip helps avoid damage to the underside of the cooktop glass from debris and helps the cooktop sit flat on Cooktop Glass uneven counters. STEP 2 Place cooktop Cooktop Insert the cooktop centerd into the cutout opening. Make sure the cooktop is parallel to the front edge of the countertop. Make final check that all required clearances are met. STEP 3-1 Bracket Guide Installing -Main The bracket Guide can be installed after cooktop is placed into the cutout. Bottom of Cooktop 1. Attach bracket guide to bottom of cooktop and side of wall. 2. Adjust to match hole of bracket and bottom of cooktop. 3. Tighten screw enough to hold bracket in place when cooktop is placed in cutout. 4. Using 2 or more people, turn the cooktop right side up and place in cutout. M4 L10 screw M4 L16 screw NOTE Make sure that the front edge of the cooktop is parallel to the front edge of the countertop. If repositioning is needed, lift entire cooktop up from cutout to avoid scratching the countertop. STEP 3-2 Alternative Bracket Guide Installing Countertop UNC 243/16 L75 screw 1. Attach bracket guide to bottom and select bracket location. 2. Tighten screw bracket guide to base of cooktop. 3. Install UNC 243/16 L75 screw until it touches the bottom of the countertop. Cooktop M4 X L10 screw Turn the thumbscrew until bracket touches the bottom of the countertop. Do not over tighten. Installation instructions 8 English CHEF-INDU_NZ30M9880_NZ36M9880_DG68-00827B-01_EN+MES+CFR.indb 8 5/25/2018 7:07:52 PM
-
 1
1 -
2
-
 3
3 -
 4
4 -
 5
5 -
 6
6 -
 7
7 -
 8
8 -
 9
9 -
 10
10 -
 11
11 -
 12
12 -
 13
13 -
14
-
15
-
16
-
17
-
18
-
19
-
20
-
21
-
22
-
23
-
24
-
25
-
26
-
27
-
28
-
29
-
30
-
31
-
32
-
33
-
34
-
35
-
36
 |
 |
