Ryobi P26011BTLVNM Operation Manual
Ryobi P26011BTLVNM Manual
 |
View all Ryobi P26011BTLVNM manuals
Add to My Manuals
Save this manual to your list of manuals |
Ryobi P26011BTLVNM manual content summary:
- Ryobi P26011BTLVNM | Operation Manual - Page 1
Symbols 5-6 Features 7 Assembly 7 Operation 8-9 Maintenance 10-11 Parts Ordering/Service......... Back Page WARNING: To reduce the risk of injury, the user must read and understand the operator's manual before using this product. TABLE DES MATIÈRES Avertissements de sécurit - Ryobi P26011BTLVNM | Operation Manual - Page 2
le manuel d'utilisation. Consulte esta sección desplegable para ver todas las figuras a las que se hace referencia en el manual del operador. Fig. 1 C D A H E F B A - Blades (lames, hojas) B - Scabbard (fourreau, funda) C - Debris deflector (déflecteur de débris, deflector de desechos) D - Front - Ryobi P26011BTLVNM | Operation Manual - Page 3
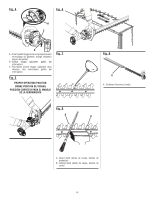
Fig. 4 Fig. 6 A C B A - Front handle/trigger lock-out (poignée avant/ verrouillage de gâchette, mango delantero seguro de gatillo) B - Switch trigger (gâchette, gatillo del interruptor) C - Two-speed switch trigger (gâchette deux vitesses, dos velocidades gatillo del interruptor) Fig. 5 PROPER - Ryobi P26011BTLVNM | Operation Manual - Page 4
shock, fire and/or serious injury. Save all warnings and instructions for future reference. The term "power tool" in the can be drawn into air vents. Do not use on a ladder or unstable support. Stable footing on a solid surface enables better control of the power tool in unexpected situations - Ryobi P26011BTLVNM | Operation Manual - Page 5
be performed by the manufacturer or authorized service providers. When servicing a power tool, use only identical replacement parts. Follow instructions in the Maintenance section of this manual. Use of unauthorized parts or failure to follow Maintenance instructions may create a risk of shock or - Ryobi P26011BTLVNM | Operation Manual - Page 6
of personal injury from the blades. When clearing jammed material or servicing the unit, make sure all power switches are off and the dry, clean, and free from debris. Clean after each use; see storage instructions. Secure the unit while transporting. Battery operated units do not have to - Ryobi P26011BTLVNM | Operation Manual - Page 7
will allow you to operate the product better and safer. SYMBOL NAME EXPLANATION Safety Alert Symbol Indicates a potential personal injury hazard. Read Operator's Manual Eye Protection Wet Conditions Alert Rain Symbol To reduce the risk of injury, user must read and understand operator - Ryobi P26011BTLVNM | Operation Manual - Page 8
SYMBOLS Some of the following symbols may be used on this product. Please study them and learn their meaning. Proper interpretation of these symbols will allow you to operate the product better and safer. SYMBOL NAME EXPLANATION Electric Shock Failure to use in dry conditions and to observe - Ryobi P26011BTLVNM | Operation Manual - Page 9
YOUR HEDGE TRIMMER See Figure 1. The safe use of this product requires an understanding of the information on the tool and in this operator's manual as well as a knowledge of the project you are attempting. Before use of this product, familiarize yourself with all operating features and safety rules - Ryobi P26011BTLVNM | Operation Manual - Page 10
or damaged parts are replaced. Please contact customer service or an authorized service center for assistance. APPLICATIONS You may use this product : Never use the debris deflector as a handle or attempt to hold or guide the hedge trimmer by gripping the debris deflector. Always keep both hands on - Ryobi P26011BTLVNM | Operation Manual - Page 11
complete charging instructions, see the operator's manuals for away from you in a safe manner. Disconnect the electrical service to the damaged line or cord before attempting to free the the hedge at this height. Trim the hedge just above this guide line of string. Trim the side of a hedge so that - Ryobi P26011BTLVNM | Operation Manual - Page 12
: Always wear eye protection with side shields marked to comply with ANSI Z87.1. If operation is dusty, also wear a dust mask. WARNING: When servicing, use only identical replacement parts. Use of any other parts may create a hazard or cause product damage. WARNING: Never use water or any liquids - Ryobi P26011BTLVNM | Operation Manual - Page 13
MAINTENANCE CLEANING THE HEDGE TRIMMER Remove the battery pack. Slide the scabbard over the blade. Clean dirt and debris from the body of the hedge trimmer, using a damp cloth with a mild detergent. NOTE: Do not use any strong detergents on the plastic housing or the handle. They can be - Ryobi P26011BTLVNM | Operation Manual - Page 14
un incendie ou des blessures graves. Conserver les avertissements et les instructions à des fins de référence ultérieure. Le terme « outil ouïes d'aération. Ne pas utiliser l'outil sur une échelle ou un support instable. Une bonne tenue et un bon équilibre permettent de mieux contrôler l'outil en - Ryobi P26011BTLVNM | Operation Manual - Page 15
endommagés. Seuls le fabricant et les fournisseurs de service autorisés doivent effectuer la réparation ou l'entretien des blocspiles. Utiliser exclusivement des pièces identiques à celles d'origine pour les réparations. Se conformer aux instructions de la section Entretien de ce manuel. L'usage - Ryobi P26011BTLVNM | Operation Manual - Page 16
avec de l'eau ou tout autre liquide. Garder les poignées sèches, propres et exemptes de débris. Nettoyer après chaque utilisation. Voir les instructions de Remisage. Arrimer le produit avant de le transporter. Les outils fonctionnant sur piles n'ayant pas besoin d'être branchés sur une prise - Ryobi P26011BTLVNM | Operation Manual - Page 17
SYMBOLES Les termes de mise en garde suivants et leur signification ont pour but d'expliquer le degré de risques associé à l'utilisation de ce produit. SYMBOLE SIGNAL SIGNIFICATION DANGER: Indique une situation dangereuse qui, si elle n'est pas évitée, aura pour conséquences des blessures - Ryobi P26011BTLVNM | Operation Manual - Page 18
SYMBOLES Certains des symboles ci-dessous peuvent être utilisés sur ce produit. Veiller à les étudier et à apprendre leur signification. Une interprétation correcte de ces symboles permettra d'utiliser l'outil plus efficacement et de réduire les risques. SYMBOLE NOM DÉSIGNATION / EXPLICATION - Ryobi P26011BTLVNM | Operation Manual - Page 19
ASSEMBLAGE DÉBALLAGE Ce produit a été expédié complètement assemblé. n Avec précaution, sortir le produit et les accessoires de la boîte. S'assurer que toutes les pièces figurant sur la Liste de contrôle sont incluses. AVERTISSEMENT : Ne pas utiliser le produit s'il n'est pas complètement assembl - Ryobi P26011BTLVNM | Operation Manual - Page 20
ont pas été remplacées. Pour obtenir de l'aide, veuillez communiquer avec le service à la clientèle ou un centre de réparations agréé. APPLICATIONS Ce produit du déflecteur de débris avec les rainures du guide. Glisser le déflecteur sur toute la longueur du guide jusqu'à ce que le bord incliné du - Ryobi P26011BTLVNM | Operation Manual - Page 21
UTILISATION DÉMARRAGE ET ARRÊT DU TAILLE-HAIES Voir la figure 4. Pour démarrer : Retirer le fourreau, si installé. Tenir la poignée avant pour désengager son verrouillage de la gâchette. Placer le sélecteur de vitesse en position BASSE (1) ou HAUTE (2). Appuyer sur la gâchette pour - Ryobi P26011BTLVNM | Operation Manual - Page 22
le produit tant que toutes les pièces manquantes ou endommagées n'ont pas été remplacées. Pour obtenir de l'aide, veuillez communiquer avec le service à la clientèle ou un centre de réparations agréé. ENTRETIEN GÉNÉRAL Éviter d'utiliser des solvants pour le nettoyage des pièces en plastique. La - Ryobi P26011BTLVNM | Operation Manual - Page 23
-2579 APLPLEALMEERALLE www.ryobitools.com NOUS APPELER D'ABORD Pour toute question concernant l'utilisation ou l'entretien utiliser ce produit, appeler le service d'assistance téléphonique RYOBI ! Le taille-bordures à été entièrement testé avant expédition pour assurer la complète satisfaction de - Ryobi P26011BTLVNM | Operation Manual - Page 24
ADVERTENCIAS DE SEGURIDAD GENERALES PARA EL USO DE HERRAMIENTAS ELÉCTRICAS ¡ADVERTENCIA! exterior. Usando un cordón adecuado para el exterior se disminuye el riesgo de descargas eléctricas. Lea todas las advertencias de seguridad, instrucciones, ilustraciones y especificaciones proporcionadas - Ryobi P26011BTLVNM | Operation Manual - Page 25
a una herramienta eléctrica, sólo utilice piezas de repuesto idénticas. Siga las instrucciones señaladas en la sección Mantenimiento de este manual. El empleo de piezas no autorizadas o el incumplimiento de las instrucciones de mantenimiento puede significar un riesgo de descarga eléctrica o de - Ryobi P26011BTLVNM | Operation Manual - Page 26
ADVERTENCIAS DE SEGURIDAD DE LA PODADORA DE SETOS Mantenga todas las partes del cuerpo alejadas de la hoja de corte. o retire material cortado ni sujete material por cortar mientras estén moviéndose las hojas. Las hojas sigue moviéndose después de desactivar el interruptor. Un momento de inatenci - Ryobi P26011BTLVNM | Operation Manual - Page 27
su significado para mayor seguridad al manejar este producto. SÍMBOLO NOMBRE DENOMINACIÓN / EXPLICACIÓN Alerta de seguridad Indica un peligro posible de lesiones personales. Lea el manual del operador Protección ocular Para reducir el riesgo de lesiones, el usuario debe leer y comprender el - Ryobi P26011BTLVNM | Operation Manual - Page 28
la figura 1. Para usar este producto con la debida seguridad se debe comprender la información indicada en la herramienta misma y en este manual, y se debe comprender también el trabajo que intenta realizar. Antes de usar este producto, familiarícese con todas las características de funcionamiento - Ryobi P26011BTLVNM | Operation Manual - Page 29
faltantes, le suplicamos llamar al 1-800-525-2579 donde le brindaremos asistencia. LISTA DE EMPAQUETADO Podadora de setos Deflector de desechos Funda Manual del operador ADVERTENCIA: Si falta o está dañada alguna pieza, no utilice este producto hasta tenerlas todas completas. Le fait d'utiliser ce - Ryobi P26011BTLVNM | Operation Manual - Page 30
la podadora de setos a fin de evitar arranques accidentales que pueden causar lesiones serias. Para obtener instrucciones específicas de carga, lea el manual del operador que se incluye con el cargador y la batería. ENCENDIDO Y APAGADO PODADORA DE SETOS Vea la figura 4. Para encendido: Retire la - Ryobi P26011BTLVNM | Operation Manual - Page 31
(1 pulg.), ni aquéllas demasiado gruesas para entrar en los entredientes de las hojas de corte. Para podar tallos gruesos utilice una sierra de podar manual o de motor. Si se atascan las hojas, apague el motor, permita que se detengan las hojas y retire el paquete de baterías antes de intentar - Ryobi P26011BTLVNM | Operation Manual - Page 32
MANTENIMIENTO ADVERTENCIA: Al dar servicio a la unidad, sólo utilice piezas de repuesto Ryobi idénticas. El empleo de piezas diferentes puede causar un peligro o dañar el producto. ADVERTENCIA: Siempre póngase protección ocular con protección lateral con la marca de cumplimiento de la norma ANSI - Ryobi P26011BTLVNM | Operation Manual - Page 33
MANTENIMIENTO Retire el paquete de baterías de la podadora de setos. Sujete el conjunto de las hojas en una prensa de banco y lime la superficie expuesta de cada diente con una lima redonda de 203 mm (8 pulg.) de largo y 6,3 mm (1/4 pulg.) o 5,5 mm (7/32 pulg.) de diámetro. Asegúrese de - Ryobi P26011BTLVNM | Operation Manual - Page 34
OBTAIN CUSTOMER OR TECHNICAL SUPPORT: To obtain customer or technical support please contact us at 1-800-525-2579. RYOBI is a registered trademark of Ryobi Limited and is used pursuant to a license granted by Ryobi Limited. • PIÈCES ET SERVICE : Avant de faire la demande de service ou l'achat de pi
-
 1
1 -
 2
2 -
 3
3 -
 4
4 -
 5
5 -
 6
6 -
 7
7 -
8
-
9
-
10
-
11
-
12
-
13
-
14
-
15
-
16
-
17
-
18
-
19
-
20
-
21
-
22
-
23
-
24
-
25
-
26
-
27
-
28
-
29
-
30
-
31
-
32
-
33
-
34
 |
 |

OPERATOR’S MANUAL
MANUEL D’UTILISATION
MANUAL DEL OPERADOR
18 VOLT BRUSHLESS
HEDGE TRIMMER
TAILLE-HAIES
SANS BALAIS DE 18 V
PODADORA DE SETOS
SIN ESCOBILLAS DE 18 V
P26011
WARNING:
To reduce the
risk of injury, the user must read and
understand the operator’s manual
before using this product.
TABLE OF CONTENTS
General Power Tool Safety
Warnings
.........................................
2-3
Hedge Trimmer Safety Warnings
........
4
Symbols
..........................................
5-6
Features
..............................................
7
Assembly
............................................
7
Operation
........................................
8-9
Maintenance
...............................
10-11
Parts Ordering/Service
........
Back Page
AVERTISSEMENT :
Pour
réduire les risques de blessures,
l’utilisateur doit lire et veiller à bien
comprendre le manuel d’utilisation avant
d’employer ce produit.
TABLE DES MATIÈRES
Avertissements de sécurité
généraux aux outils électriques
......
2-3
Avertissements de sécurité pour la
taille-haies
...........................................
4
Symboles
........................................
5-6
Caractéristiques
..................................
6
Assemblage
........................................
7
Utilisation
........................................
8-9
Entretien
......................................
10-11
Commande de pièces/
réparation
..........................
Páge arrière
ADVERTENCIA:
Para reducir
el riesgo de lesiones, el usuario debe leer
y comprender el manual del operador
antes de usar este producto.
ÍNDICE DE CONTENIDO
Advertencias de seguridad
generales para el uso
de herramientas eléctricas
..............
2-3
Advertencias de seguridad
de la podadora de setos
.....................
4
Símbolos
.........................................
5-6
Características
....................................
6
Armado
...............................................
7
Funcionamiento
..............................
7-9
Mantenimiento
............................
10-11
Pedidos de piezas/
servicio
...........................
Pág. posterior
SAVE THIS MANUAL FOR
FUTURE REFERENCE
CONSERVER CE MANUEL
POUR FUTURE RÉFÉRENCE
GUARDE ESTE MANUAL
PARA FUTURAS CONSULTAS