RCA M61WH185 User Manual - Page 18
HDMI Connection
 |
View all RCA M61WH185 manuals
Add to My Manuals
Save this manual to your list of manuals |
Page 18 highlights
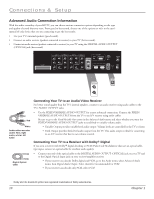
Connections & Setup HDMI Connection INPUT 1 INPUT 2 INPUT 3 COMPONENT/COMPOSITE COMPOSITE COMPONENT/COMPOSITE Y/VIDEO L VIDEO Y/VIDEO L PB R L PB R PR S-VIDEO R PR S-VIDEO C SVGA INPUT AUDIO VGA/SVGA/XGA FIXED/VARIABLE AUDIO OUTPUT WIRED REMOTE CONTROL (IR) ANTENNA INPUT L DIGITAL AUDIO CABLE HDMI 1 INPUT HDMI 2 INPUT OUTPUT For Factory INPUT use only R (OPTICAL) INPUT 4 COMPOSITE VIDEO L R Note: This back panel graphic is for representation only. Your back panel might be different. A L R Audio Out B Device with DVI DVI Out OR Device with HDMI Y Pb Pr Video Out R L Audio Out HDMI Out HDMI cable HDMI/DVI adapter Red White Audio cables are color coded- Red= right audio; white= left audio Connecting the Device High-Definition Multimedia Interface (HDMI) is an uncompressed digital interface that carries both video and audio data by way of an integrated mini-plug cable. Since HDMI is based on Digital Visual Interface (DVI), the jack on the back of your TV is also compatible with devices that have a DVI jack. Using the example of a set-top box: • If your set-top box has a DVI jack, connect an HDMI cable and an HDMI/ DVI adapter. A. Connect an HDMI cable to the HDMI INPUT jack on the back of the TV. B. Attach an HDMI/DVI adapter to the end of the HDMI cable, then connect the adapter to the DVI Out jack on the back of the device. C. Since you're using an HDMI/DVI adapter, you need to connect Audio left and right cables to the R and L jacks on the back of the device and to R and L Audio jacks that aren't in use on the back of the TV. After you've completed the on-screen Assisted Setup (page 19), go to the DVI Audio Input option in the Advanced Audio menu to select which Audio Input jack you're using. In the example on the opposite page you would choose INPUT 4. 16 Chapter 1
-
 1
1 -
2
-
3
-
4
-
5
-
6
-
7
-
8
-
9
-
10
-
11
-
12
-
 13
13 -
 14
14 -
 15
15 -
 16
16 -
 17
17 -
 18
18 -
 19
19 -
 20
20 -
 21
21 -
 22
22 -
 23
23 -
24
-
25
-
26
-
27
-
28
-
29
-
30
-
31
-
32
-
33
-
34
-
35
-
36
-
37
-
38
-
39
-
40
-
41
-
42
-
43
-
44
-
45
-
46
-
47
-
48
-
49
-
50
-
51
-
52
-
53
-
54
-
55
-
56
-
57
-
58
-
59
-
60
-
61
-
62
-
63
-
64
-
65
-
66
-
67
-
68
-
69
-
70
-
71
-
72
-
73
-
74
-
75
-
76
-
77
-
78
-
79
-
80
 |
 |
