Pyle PVCD15 Instruction Manual - Page 1
Pyle PVCD15 Manual
 |
View all Pyle PVCD15 manuals
Add to My Manuals
Save this manual to your list of manuals |
Page 1 highlights
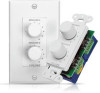
210x285mm PVCD15 High-Power In-Wall Stereo Volume control Your PYLE High-Power In-wall stereo volume control lets you adjust the volume on a pair speaker that are located in a room separate from the amplifier,so you can control the sound on the spot. Mounting the Volume Control The volume control is designed to be mounted in a standard electrical wall box. Select a location that is: Caution: thIs volume contraIls limIted to a maxImum of 120 watts RMS per channel. • Within reach of the speaker wires • Easy to reach for using the volume control Connections Notes: • This volume control can be used with up to 14-gauge wire. • Measure the distance from the speaker to the amplifier. For distances of 50 feet or less, use 18-gauge speaker wire or ordinary lamp cord. For distances greater than 50 feet, use heavier 16-gauge wire. Caution: Letting strav wire ends touch an adjacent terminal. the mounting brackets or screws. or the metal sides of the electrical box could cause a short cIrcuit of damage a speaker. Figure #1 - - Amplifier/Receiver + + Caution: You must mount the volume control In a standard electrical box. Do not mount It dlrectlv on a wall. Important: • Over-Tightening the screws might damage the wall plate. • Some electrical wall boxes are a nonstandard size.Be sure that you measure the wall box before you mount the volume control. Once the control has been wired, it is ready to be mounted into the wall. Referring to Figure #2, place the components of the volume control into the wall in the order illustrated. Use the enclosed screws to hold the components in place. NOTE: The rotary switch is shipped with the control turned as far counterclockwise as it will turn off. If you changed this, return it to the full counterclockwise position before starting installation. Figure #2 I I ( ') ~U E'\ E '='I EIUV I I ~t Speaker B l J~ Speaker A 1. Strip off Y, inch(12.7mm) of insulation from each end of the amplifier/receiver and speaker wires . Caution: Be sure to follow the correct polarltv(+ to + andto .) when making connections. Improper connections might cause poor sound reproduction. 2. Insert the amplifier/receive's + and - speakers output wires into the vomume control's INPUT +(positive) and -(negative) terminals, then tighten the screws. 3. Insert the speaker's + and - wire ends into volume control's OUTPUT + and - terminals, then tighten the screws. ELECTRICAL BOX SPEAKER W IRE VOLUME CONTROL INSTALLATION SCREWS (supplied) DECORATOR COVER PLATE Isupplied) COVER PLATE SCREWS (supplied) Operation Set the amplifier/receive's volume control to minimum by turning it fully counterclockwise. Then turn on the amplifier/receiver and set its volume control slightly above the normal listening level. To increase or decrease the remote speaker's volume, turn the wall-mount volume control clockwise or counterclockwise.
-
 1
1
 |
 |
