Pyle PTCDS7UIW User Guide - Page 2
supply voltage of your area and select the proper voltage position of the 110/220V
 |
View all Pyle PTCDS7UIW manuals
Add to My Manuals
Save this manual to your list of manuals |
Page 2 highlights
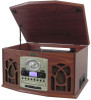
Location of controls 1) Dial pointer 2) LCD display 3) Functions switch 4) Power LED indicator 5) Power on/off, volume up/down knob 6) MP3 folder up button 7) Source button 8) Extra bass on/off button 9) Record button 10) CD door 11) SD/MMC card slot 12) Radio band selector switch 13) FM stereo LED indicator 14) Tuning knob 15) Remote sensor 16) Skip/search down button 17) Skip/search up button 18) CD door open button 19) Play/pause/stop button 20) USB socket 21) 3.5 mm headphone jack 22) Tape forward / eject button 23) Cassette door cover 24) Mobile drawer 25) Aux in jack 26) Spindle adaptor 27) Turntable selector 28) Pick-up holder 29) FM wire antenna 30) Line out socket (l/r) 31) Auto stop switch 32) 110/220V selector 33) AC cord Caution: Usage of controls or adjustments or performance of procedures other than those specified herein may result in hazardous radiation exposure. This unit should not be adjusted or repaired by anyone except qualified service personnel. Precautions for use Installation Unpack all parts and remove protective material. Do not connect the unit to the mains before checking the mains voltage and before all other connections have been made. Do not cover any vents and make sure that there is a space of several centimeters around the unit for ventilation. Connection Caution : before connect the AC cord to main AC outlet, please check carefully the supply voltage of your area and select the proper voltage position of the 110/220V selector(32). Since wrong selection of the 110/220V selector (32) and plugged the unit to main AC outlet will damage your unit and fire hazard can also occur. 1. Connect the power cord (33) to AC outlet. 2. Turn on the power (5) until the LCD display (2) with blue backlight on. 3. Then switch the Function selector (3) to " Tuner " function. If sound is coming out from the speaker, it's mean the power supply is normal. Now your system is ready to play the music. E-1
-
 1
1 -
 2
2 -
 3
3 -
 4
4 -
 5
5 -
 6
6 -
 7
7 -
 8
8 -
9
 |
 |
