Pyle PSWWM90Y PSWWM90BK Manual 1 - Page 3
Pyle PSWWM90Y Manual
 |
View all Pyle PSWWM90Y manuals
Add to My Manuals
Save this manual to your list of manuals |
Page 3 highlights
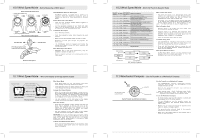
4.0 Real Time Mode - Date/Time Display & Pressure Tendency /Time Display 12 12 10 10 8 8 6 6 4 4 2 2 BEAUFORT SCALE start/stop button start/stop button 12 12 10 10 8 8 6 6 4 4 2 2 BEAUFORT SCALE Date/time Display Pressure Tendency/ Time Display Real Time Mode month date pressure tendency graph day of week bar indicator 1st column 2nd column 3rd column 12 12 10 10 8 8 6 6 4 4 2 2 BEAUFORT SCALE Date/time Display bar indicator real time 12 12 10 10 8 8 6 6 4 4 2 2 BEAUFORT SCALE Pressure Tendency/ Date Display Features of the two Sub-displays Real Time Mode Sub-display - Real Time Mode has two sub-displays: Date/ Time Display and Pressure Tendency/ Time Display. - Press the [start/stop] button once to switch between the Date/Time Display and the Pressure Tendency/ Time Display. Date/ Time Display - Date / Time Display shows the day of week, month and day in the top row of the display. - The bottom row of the display shows current time in hour, minute and second. - The bar indicators on the left and right sides of the display stimulate the elapse of second. Pressure Tendency/ Time Display - The 1st column of the graph shows the relative pressure of the last 6 to 9 hours. - The 2nd column of the graph shows the relative pressure of the last 3 to 6 hours. - The 3rd column of the graph shows the relative pressure of the last 3 hours. - Check the 'Implication of the Pressure Tendency Graph' section for more detail. 4.1 Real Time Mode - Setting the Time and Date 12 12 10 10 8 8 6 6 4 4 2 2 BEAUFORT SCALE hold adju st Pressure Tendency Time Display or 12 12 hold adju st 10 10 8 8 6 6 4 4 2 2 BEAUFORT SCALE 12 12 10 10 8 8 6 6 4 4 2 2 BEAUFORT SCALE Date/time Setting Display second flashing Date/time Display Real Time Setting Display start/stop start/stop start/stop second minute hour year To Set the Time and Date - To set the date and time, press and hold the [adjust] button for 2 seconds to change from Date/ Time Display or Pressure Tendency/Time Display to Date/Time Setting Display. - The second digits flash on the display because they are being selected. The Setting Procedures - Press [start/stop] button to change the selection as in the Real Time Setting Sequence. - While digits are flashing (selected), press the [select] button to increase the number. Hold down the [select] button to change the number at a higher speed. - While 12 or 24 hour format setting is being selected, press the [select] button to switch between the two formats. - While display contrast setting is being selected, press the [select] button to select the contrast from 0 to 15. 15 gives a darker display; 0 gives a lighter display. - After you set the time, date, display format and display contrast, press the [adjust] button to exit the Real Time Setting Sequence. - If no any key operation in the setting display for about 3 minutes, the WindMaster will return to the Real Time Mode automatically start/stop start/stop start/stop display contrast 12/24 hour start/stop start/stop day month Real Time Setting Sequence 5.0 Alarm Time Mode - Alarm Time 1 & 2 Display, & Setting the Chime/Alarm On/Off 12 12 10 10 8 8 6 6 4 4 2 2 BEAUFORT SCALE start/stop start/stop 12 12 10 10 8 8 6 6 4 4 2 2 BEAUFORT SCALE Alarm Time 1 Display Alarm Time Mode Alarm Time 2 Display Alarm Time Mode - Alarm Time Mode has two sub-displays: Alarm Time 1 and the Alarm Time 2. - Alarm Time 1 and Alarm Time 2 work independently. - Press the [start/stop] button to switch between the Alarm Time 1 Display and Alarm Time 2 Display. To Set the Alarm and Chime On or Off - In the Alarm Time 1 Display or Alarm Time 2 Display, press the [select] button to change the ON/OFF status of the hourly chime and alarm. - When the alarm is ON, the WindMaster sounds at the preset alarm time each day. - To stop the sound, press any button to stop the alarm. - When the chime is ON, the WindMaster beeps every hour on the hour. 5.1 Alarm Time Mode - Setting the Alarm Time 1 and 2 12 12 10 10 8 8 6 6 4 4 2 2 BEAUFORT SCALE Alarm Time 1 Display hold adju st minute flashing 12 12 10 10 8 8 6 6 4 4 2 2 BEAUFORT SCALE Alarm Time 2 Display hold adju st minute flashing 12 12 10 10 8 8 6 6 4 4 2 2 BEAUFORT SCALE Alarm Time 1 Setting Display 12 12 10 10 8 8 6 6 4 4 2 2 BEAUFORT SCALE Alarm Time 2 Setting Display Alarm Time Setting Display To Set The Alarm Time 1 - Press and hold the [adjust] button for 2 seconds to change from Alarm Time1 Display to Alarm Time 1 Setting Display. - The minute digits flash on the display because it is being selected. The Setting Procedures - Press [start/stop] button to change the selection in the Alarm Time Setting Sequence. - While any digits are flashing (selected), press [select] button to increase the number. Hold down the [select] button to change the number at a higher speed. - After you set the alarm time, press the [adjust] button to exit the setting sequence. - If no any key operation in the setting display for about 3 minutes, the WindMaster will return to the Alarm Time Mode automatically - Set the Alarm Time 2 in the same manner as Alarm Time 1. Increase Increase the minute Increase the minute at a higher speed the hour Increase the hour at a higher speed select hold select select start/stop minute hour hold select start/stop Alarm Time Setting Sequence
-
 1
1 -
 2
2 -
 3
3 -
 4
4 -
 5
5 -
 6
6 -
 7
7 -
 8
8 -
 9
9
 |
 |
