Pyle PLR18MPF PLR18MPF Manual 1 - Page 2

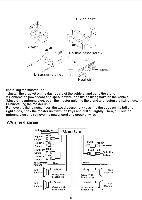
III.Technical parameters, IV.lnstaliation diagram - manual

Page 2 highlights

Channels. When the signal from desire channel is received, press this button again to listen to the program . 7.Tuner knob In radio state, rotate the knob to left/right to scan radio channels automatically or manually. 8.Prev. button In USB/SD/MMC playing state, press this button to select and play previous track, or press and hold it to select and play -1 0 previous tracks. In radio state, press this button to select and play previous channel. 9.Power switch Press this button to turn on the device and press it again to turn off. 10.SD/MMC card slot Insert SD/MMC card and play the tracks automatically. 11.USB interface Insert USD disk and play the tracks automatically. 12.Mode switch Press the MOD button to switch mode. If USB disk and SD/MMC card are connected to the device, press the MOD button to switch in this sequence: USB, SD/MMC, radio; if only USB disk or SD/MMC card is connected, press the MOD button to switch between available modes ; if both USB disk and SD/MMC card are not connected, MOD button is invalid. 13.Band button In radio state, press this button to select the band . III.Technical parameters FMTUNER Tu ning ra ng e 87.5 MHz-1 08 MHz Intermed iate frequency 10. 7M Hz SNR 50dB AMTUNER Tu ni ng range 530-171 OKHz Usa b lese nsit iv ity 38d B Playing : SNR 50d B Chan nel isol atio n(at 1 kHz 23d B Harmonic distortion (at 1 kHz 5% Frequency response 100 Hz-10kHz) ± 6d B Power amplifier: Output Speaker 0 utp ut Spea ke rim peda nce 4 Q--8 Q Maximum output power 5OWX4(200Watts) Power supply 12V DC car batteries IV.lnstaliation diagram 1.Before installing the master unit, put it in the proper position, and connect the speaker wire and power cord. 2.1f the master unit runs normally, fix it. 2.

  • 1
  • 2
  • 3
  • 4

Channels. When the signal from desire channel is received, press this button again to
listen to the program.
7 .Tuner knob
In
radio state, rotate the knob to
left/right
to scan radio channels automatically
or
manually.
8.Prev. button
In
USB/SD/MMC playing state, press this button to
select
and play previous track,
or
press and hold it to
select
and play
-1
0 previous tracks. In radio state, press this button
to
select
and play previous channel.
9.Power switch
Press this button to turn on the device and press it again to turn off.
10.SD/MMC card
slot
Insert SD/MMC card and play the tracks automatically.
11.USB interface
Insert USD
disk
and play the tracks automatically.
12.Mode switch
Press the MOD button to switch mode.
If
USB
disk
and SD/MMC card are connected to
the device, press the MOD button to switch in this sequence: USB, SD/MMC, radio;
if
only USB
disk
or
SD/MMC card is connected, press the MOD button to switch between
available modes;
if
both USB
disk
and SD/MMC card are not connected, MOD button is
invalid.
13.Band button
In
radio state, press this button to
select
the band.
III.Technical parameters
FMTUNER
Tu
ni ng
ra
ng
e:
--
-----------------------------------------------------------------8
7.5 MHz
-1
08 MHz
Intermed iate frequency: ------------------------------------------------------------------10.
7M
Hz
S N R: --------------------------------------------------------------------------------------------
=
50d B
AMTUNER
Tu
ni ng range -------------------------------------------------------------------------530-171 OKHz
Usa b
lese
nsit
iv ity
------------------------------------------------------------------------------
38d B
Playing :
S N R:
-------------------------------------------------------------------------------------------
;:, 50d B
C han nel isol atio n(at 1 kHz):---------------------------------------------------------------
;:, 2 3d B
Harmonic distortion (at 1 kHz):
--------------------------------------------------------------
:::;
5%
Frequency response:
-----------------------------------------------------(
100
Hz-10kHz)
±
6d B
Power amplifier:
Out put:-------------------------------------------------------------------------------
S pe a k e r
0
utp ut
S pea ke
rim
peda n ce:
------------------------------------------------------------------------4
Q--8 Q
Maximum output power: -----------------------------------------------------5OWX4(200Watts)
Power
supply:---------------------------------------------------------------
12V DC car batteries
IV.lnstaliation diagram
1.Before installing the master unit, put it in the proper position, and connect the
speaker
wire and power cord.
2.1f
the master unit runs normally, fix it.
2.