Polk Audio SurroundBar 400 CHT SurroundBar400 500 CHT Manual - German, Italian - Page 3
Inventaraufnahme, Surroundbar 400 Cht, Surroundbar 500 Cht, Informationen Zur Surroundbar Cht,
 |
View all Polk Audio SurroundBar 400 CHT manuals
Add to My Manuals
Save this manual to your list of manuals |
Page 3 highlights
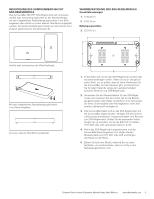
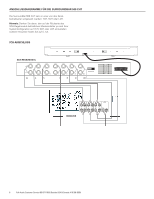
DEUTSCH INVENTARAUFNAHME Prüfen Sie, dass sich alles im Karton der Polk Audio® SurroundBar® 400 Component Home Theater (CHT) oder der SurroundBar 500 CHT befindet. Sie sollten Folgendes vorfinden: SURROUNDBAR 400 CHT: SurroundBar 400-Lautsprecher Wandbefestigung 4,6 m langes farblich kodiertes Kabel 2 Gummifüßchen Benutzerhandbuch Online-Registrationskarte SURROUNDBAR 500 CHT: SurroundBar 500-Lautsprecher SDA-Regelmodul Wandbefestigungsschablone für das SDA-Regelmodul Rack-Befestigungswinkel mit Schrauben Wandbefestigung 4,6 m langes Kabel 2 Gummifüßchen Benutzerhandbuch Online-Registrationskarte Wichtiger Hinweis: Falls Sie Schäden oder fehlende Teile bemerken oder Ihr Polk Audio SurroundBar CHT-System nicht funktioniert, kontaktieren Sie bitte sofort Ihren Händler. Behalten Sie den Originalkarton und das Verpackungsmaterial, um das Produkt in Zukunft transportieren zu können. INFORMATIONEN ZUR SURROUNDBAR CHT Danke, dass Sie die SurroundBar CHT von Polk Audio gewählt haben. Sie werden bald entdecken, dass der legendäre Sound von Polk Audio Fernsehsendungen und Filme noch aufregender macht. Die SurroundBar CHT bietet eine breite Klangbühne und einen satten, vollen Sound, ohne dass hintere Lautsprecher und lästige hintere Lautsprecherkabel nötig wären. KARTONINHALT FÜR DIE SURROUNDBAR CHT: SURROUNDBAR 400 CHT: SurroundBar 400-Lautsprecher Wandbefestigung 4,6 m langes farblich kodiertes Kabel Gummifüßchen SURROUNDBAR 500 CHT: SurroundBar 500-Lautsprecher Wandbefestigung Screw location for horizontal mounting Position de la vis pour montage horizontal Screw location for vertical mounting Position de la vis pour montage vertical Crossover Module Wall Mount Template 1. Determine crossover module location. 2. Hold or tape the template to the mounting location, either in a vertical or horizontal position. 3. Mark the holes for the keyhole mounting screws 4. Attach the mounting screws into the wall stud or, if directly into drywall, by using wall anchors. Leave enough of the screw exposed so that the keyhole slots will rest securely on the screws. 5. Attach the wires to the terminals on the back of the crossover module (see manual). 6. Mount the module on the wall. See manual for different mounting options Gabarit pour montage mural de la Crossover Module 1. Déterminez le lieu de montage de crossover module. 2. Tenez ou fixez le gabarit à l'endroit choisi- en position verticale ou horizontale. 3. Marquez les trous pour les vis de montage des supports en trou de serrure. 4. Visez les vis de montage au montant du mur- utilisez des ancres si vous visez dans le placoplâtre. Laissez dépasser les vis assez pour que les supports en trou de serrure s'enclenchent solidement sur les vis. 5. Connectez les fils de h.p. aux bornes situées à l'arrière de crossover module (consultez le manuel). 6. Montez module au mur. Consultez le manuel pour diverses options de montage. Center Point Point Central Screw location for horizontal mounting Position de la vis pour montage horizontal Screw location for vertical mounting Position de la vis pour montage vertical Wandbefestigungsschablone für das SDA-Regelmodul 4,6 m langes Kabel SDA-Regelmodul Gummifüßchen Rack-Befestigungswinkel (mit Schrauben) Customer Service Hours of Operation: Monday-Friday, 9AM-5:30PM EST [email protected] 3
-
 1
1 -
 2
2 -
 3
3 -
 4
4 -
 5
5 -
 6
6 -
 7
7 -
 8
8 -
 9
9 -
10
-
11
-
12
-
13
-
14
-
15
-
16
-
17
-
18
-
19
-
20
-
21
-
22
-
23
-
24
-
25
-
26
-
27
-
28
-
29
-
30
-
31
-
32
-
33
-
34
-
35
-
36
-
37
-
38
-
39
-
40
 |
 |
