Philips 27E1N8900 User manual - Page 13
MultiClient Integrated KVM
 |
View all Philips 27E1N8900 manuals
Add to My Manuals
Save this manual to your list of manuals |
Page 13 highlights
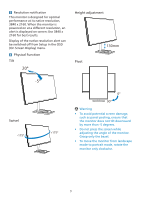
2.4 MultiClient Integrated KVM 1 What is it? With MultiClient Integrated KVM switch, you can control two separate PCs with one monitor-keyboard-mouse set up. 2 How to enable MultiClient Integrated KVM With the built-in MultiClient Integrated KVM, Philips monitor allows to quickly switch your peripherals back and forth between in two devices through the OSD menu setting. Use USB-C and HDMI or DP as input, then use USB-C/ USB-B as USB upstream Please follow the steps for the settings. 1. Connect the USB upstream cables from your dual devices to the"USB-C" and "USB up" port of this monitor at the same time. Source HDMI/DP USB C USB Upstream USB UP USB C 2. Connect peripherals to the USB downstream port of this monitor. 3. Enter to OSD menu. Go to KVM layer and select "Auto", "USB-C" or "USB up" to switch the control of peripherals from one device to another. Simply repeat this step for switching the control system using one set of peripheral. 1 USB C 1 PC1/PC2 USB UP PC1 2 USB USB PC2 3 USB-C Setting USB Standby Mode Auto USB C KVM USB up Use DP and HDMI as input then use USB-B/ USB-C as USB upstream Please follow the steps for the settings. 1. Connect the USB upstream cables from your dual devices to the "USBC" and "USB up" port of this monitor at the same time. PC1: USB UP as upstream and HDMI or DP cable for both video and audio transfer. PC2: USB-C as upstream (USB C-A) and DP or HDMI for both video and audio transfer. Source HDMI or DP DP or HDMI USB Upstream USB UP USB C 2. Connect peripherals to the USB downstream port of this monitor. 3. Enter to OSD menu. Go to KVM layer and select "Auto", "USB-C" or "USB up" to switch the control of peripherals from one device to another. Simply repeat this step for switching the control system using one set of peripheral. 1 1 PC1/PC2 USB UP PC1 2 USB USB PC2 3 USB-C Setting USB Standby Mode Auto USB C KVM USB up Note 1. You can also adopt "MultiClient Integrated KVM" in PBP mode, when you enable PBP, you can see two different sources projected to this monitor side by side simultaneously. "MultiClient Integrated KVM" 11
-
 1
1 -
2
-
3
-
4
-
5
-
6
-
7
-
 8
8 -
 9
9 -
 10
10 -
 11
11 -
 12
12 -
 13
13 -
 14
14 -
 15
15 -
 16
16 -
 17
17 -
 18
18 -
19
-
20
-
21
-
22
-
23
-
24
-
25
-
26
-
27
-
28
-
29
-
30
-
31
-
32
-
33
-
34
-
35
-
36
-
37
 |
 |
