Panasonic PTAE4000 Operating Instructions - Page 13
Remote control operation, Operating range, Managing the lens control settings
 |
View all Panasonic PTAE4000 manuals
Add to My Manuals
Save this manual to your list of manuals |
Page 13 highlights
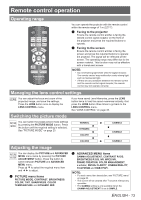
Remote control operation Remote control operation Operating range You can operate the projector with the remote control within the remote range of 7 m (22'11"). QQ Facing to the projector Ensure the remote control emitter is facing the remote control signal receptor on the front of the projector and press the required buttons to operate. QQ Facing to the screen Ensure the remote control emitter is facing the screen and press the required buttons to operate the projector. The signal will be reflected off the screen. The operating range may differ due to the screen material. This function may not be effective with a translucent screen. NOTE: •• Do not let strong light shine onto the signal receptor. The remote control may malfunction under strong light such as fluorescent light. •• If there are any obstacles between the remote control and the remote control signal receptor, the remote control may not operate correctly. Managing the lens control settings You can adjust the focus and zoom of the projected image, and save the settings. Press the LENS button once to display the LENS CONTROL menu. If you have saved Lens Memories, press the LENS button twice to load the saved memories instantly. And press the LENS button three times to go back to the LENS CONTROL menu. See "LENS CONTROL" on page 35. Switching the picture mode You can switch the preset picture mode settings by pressing the PICTURE MODE button. Press the button until the required setting is selected. See "PICTURE MODE" on page 20. NORMAL DYNAMIC COLOR1 CINEMA3 CINEMA2 COLOR2 CINEMA1 Adjusting the image You can display the PICTURE and ADVANCED MENU menu items by pressing the PICTURE ADJUSTMENT button. Press the button to switch between PICTURE and ADVANCED MENU menu. Press ▲ ▼ to select the required menu item and ◄ ► to adjust. QQ PICTURE menu items PICTURE MODE, CONTRAST, BRIGHTNESS, COLOR, TINT, SHARPNESS, COLOR TEMPERATURE and DYNAMIC IRIS QQ ADVANCED MENU items GAMMA ADJUSTMENT, CONTRAST R/G/B, BRIGHTNESS R/G/B, NR, MPEG NR, FRAME CREATION, COLOR MANAGEMENT, x.v.Color, DETAIL CLARITY, CINEMA REALITY, TV-SYSTEM and RGB/YPbPr. NOTE: •• For each menu item description, see "PICTURE menu" on page 20. •• The screen will be cleared after 7 seconds without any operation. •• The GAMMA setting is only available when the GAMMA ADJUSTMENT is set to SIMPLE. ENGLISH - 13
-
 1
1 -
2
-
3
-
4
-
5
-
6
-
7
-
 8
8 -
 9
9 -
 10
10 -
 11
11 -
 12
12 -
 13
13 -
 14
14 -
 15
15 -
 16
16 -
 17
17 -
 18
18 -
19
-
20
-
21
-
22
-
23
-
24
-
25
-
26
-
27
-
28
-
29
-
30
-
31
-
32
-
33
-
34
-
35
-
36
-
37
-
38
-
39
-
40
-
41
-
42
-
43
-
44
-
45
-
46
-
47
-
48
-
49
-
50
 |
 |
