Panasonic DMCLZ7S Digital Still Camera Pc Connect-eng/spa - Page 8
CONNECTING THE DIGITAL CAMERA TO A PC, to the PC via the supplied, USB connection cable. - software
 |
UPC - 037988986170
View all Panasonic DMCLZ7S manuals
Add to My Manuals
Save this manual to your list of manuals |
Page 8 highlights
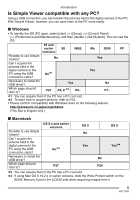
Setting up Connecting the Digital Camera to PC • When Windows 98/98SE is used, install the USB driver (P6) before connection. • If the PC has a built-in SD memory card slot, insert a Card into the slot and you can transfer pictures to the PC by use of Simple Viewer. • When the connection is established correctly, Simple Viewer automatically opens the screen to begin file transfer. (P9) If Windows 98 is used, refer to P23. A: USB connection cable B: AC Adaptor • The illustrations show examples of those of the DMC-FX12/DMC-FX10. • AC adaptors may be optionally supplied depending on the model. Preparations on the digital camera side When you connect the digital camera to the PC, use batteries with sufficient battery power or the AC adaptor. If the remaining battery power is exhausted during communication, the recorded data may be damaged. • If you use the AC adapter, connect it. • Turn on the digital camera. 1. Connect the digital camera to the PC via the supplied USB connection cable. • Set the digital camera for connecting to a PC. (For details, refer to the operating instructions for the digital camera.) • When the following screen appears, click [Cancel] to close it. • If Simple Viewer does not start automatically, refer to P27. • Do not operate the digital camera or disconnect the USB connection cable while transferring data from the digital camera. The software may not function correctly and damage the data being transferred. • The shape of the terminal varies depending on the digital camera used. For details, refer to the operating instructions for the digital camera. 8 VQT1D44
-
 1
1 -
2
-
 3
3 -
 4
4 -
 5
5 -
 6
6 -
 7
7 -
 8
8 -
 9
9 -
 10
10 -
 11
11 -
 12
12 -
 13
13 -
14
-
15
-
16
-
17
-
18
-
19
-
20
-
21
-
22
-
23
-
24
-
25
-
26
-
27
-
28
-
29
-
30
-
31
-
32
-
33
-
34
-
35
-
36
 |
 |
