Olympus P-330 P-330 Instruction Manual (1.5 MB) - Page 62
Printing, Printing an image recorded by OLYMPUS Digital Cameras
 |
UPC - 050332126459
View all Olympus P-330 manuals
Add to My Manuals
Save this manual to your list of manuals |
Page 62 highlights
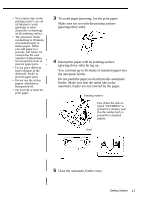
Printing Printing an image recorded by OLYMPUS Digital Cameras You can directly print the image recorded by OLYMPUS Digital Cameras. Printing operation differs depending on the model as described below. Note Before printing, be sure to close the lens barrier of the digital camera. DIGITAL VISION D-320L/D-220L/D-220 Digital Cameras 1 Check that the printer and digital camera are turned off. 2 Connect the serial port of the printer to the data in/ out port of the digital camera with a direct print cable of the serial type (not supplied). Direct print cable of the serial type (not supplied) to data in/out port to serial port 3 Turn on the printer. • Make sure that the READY indicator of the printer turns on. • Make sure that the control panel of the digital camera turns on and then goes off after a few seconds. continued Printing 19
-
 1
1 -
2
-
3
-
4
-
5
-
6
-
7
-
8
-
9
-
10
-
11
-
12
-
13
-
14
-
15
-
16
-
17
-
18
-
19
-
20
-
21
-
22
-
23
-
24
-
25
-
26
-
27
-
28
-
29
-
30
-
31
-
32
-
33
-
34
-
35
-
36
-
37
-
38
-
39
-
40
-
41
-
42
-
43
-
44
-
45
-
46
-
47
-
48
-
49
-
50
-
51
-
52
-
53
-
54
-
55
-
56
-
 57
57 -
 58
58 -
 59
59 -
 60
60 -
 61
61 -
 62
62 -
 63
63 -
 64
64 -
 65
65 -
 66
66 -
 67
67 -
68
-
69
-
70
-
71
-
72
-
73
-
74
-
75
-
76
-
77
-
78
-
79
 |
 |
