Olympus P-200 P-200 Instruction Manual (958 KB) - Page 16
Adjusting the Image Quality
 |
View all Olympus P-200 manuals
Add to My Manuals
Save this manual to your list of manuals |
Page 16 highlights
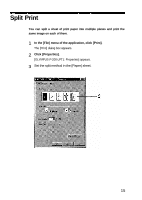
Adjusting the Image Quality You can adjust the brightness, depth, contrast and sharpness of an image for printing. Brightness: Brightness is adjusted across the entire image plane. Image brightness increases when adjusted in the + direction. Depth: Adjusts the color intensity of the image. Color intensity is increased when adjusted in the + direction. Contrast: Increases or reduces image contrast. Contrast (crispness) increases when adjusted in the + direction. Sharpness: Emphasizes or de-emphasizes image contours. Image contours are emphasized when adjusted in the + direction. 1 In the [File] menu of the application, click [Print]. The [Print] dialog box appears. 2 Click [Properties]. [OLYMPUS P-200-LPT1: Properties] appears. 3 Set the image quality in the [Color adjustment] sheet. [Brightness], [Depth] and [Contrast] each can be adjusted in 21 steps between -10 and +10. [Sharpness] can be adjusted in 11 steps between -5 and +5. To return to the default settings, click [Standard]. The default value is 0 for all settings. To cancel image quality adjustment, click [Cancel]. The [Print] dialog box appears again. Caution If your image processing application has image adjustment capabilities similar to those described above, the image quality should be adjusted with the application instead of the driver software. If the image quality is adjusted in both the application and driver software, print results may differ from what you expect. 17
-
 1
1 -
2
-
3
-
4
-
5
-
6
-
7
-
8
-
9
-
10
-
 11
11 -
 12
12 -
 13
13 -
 14
14 -
 15
15 -
 16
16 -
 17
17 -
 18
18 -
 19
19 -
 20
20 -
 21
21 -
22
-
23
-
24
-
25
-
26
-
27
-
28
-
29
-
30
-
31
-
32
-
33
-
34
-
35
-
36
-
37
-
38
-
39
-
40
-
41
-
42
-
43
-
44
-
45
-
46
-
47
-
48
-
49
-
50
-
51
-
52
-
53
-
54
-
55
-
56
-
57
-
58
-
59
-
60
-
61
-
62
-
63
-
64
-
65
-
66
-
67
-
68
 |
 |
