Olympus C-720 C-720 Ultra Zoom Reference Manual (5 MB) - Page 38
Using the Menus, What Are the Menus?, Using the Menus
 |
UPC - 072874309558
View all Olympus C-720 manuals
Add to My Manuals
Save this manual to your list of manuals |
Page 38 highlights
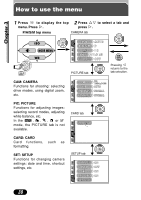
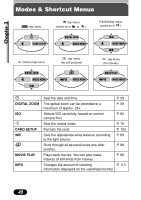
Using the Menus Chapter 3 What Are the Menus? When you turn on the camera and press the (OK/Menu) button, the menu that appears on the monitor is generally called "the top menu". Many functions of this camera are accessed using the menus. Below, we'll explain how the camera's menus work, using examples of menus displayed in the P/A/S/M mode. The top menu varies depending on the mode. ~ "Modes & short cut menus" (P. 40) The top menu appears. Press . ISO MODE MENU WB Use the arrow pad to display the menus. Short cut menus ● Take you directly to the setting screens. ● Display operational buttons at the bottom of the screen, and let you select items by pressing Ññ. ● The short cut menus can be replaced only when the mode dial is set to P/A/S/M or . ~ Setting the short cut menu (P. 107) MODE MENU ● Lets you set various functions such as the white balance, etc. ● Contains menu items. These are grouped according to function under 4 tabs. ● Select the CAMERA, PICTURE, CARD or SETUP tab by pressing Ññ. The menu for the selected tab menu appears. SET CARD PICTURE CAM SET CARD PIC CAMERA TIFF WB SHQ SHARPNESS HQ Tab CONTRAST SQ1 SQ2 ISO AUTO P/A/S/M P BKT 1.0 x3 DIGITAL ZOOM OFF 37
-
 1
1 -
2
-
3
-
4
-
5
-
6
-
7
-
8
-
9
-
10
-
11
-
12
-
13
-
14
-
15
-
16
-
17
-
18
-
19
-
20
-
21
-
22
-
23
-
24
-
25
-
26
-
27
-
28
-
29
-
30
-
31
-
32
-
 33
33 -
 34
34 -
 35
35 -
 36
36 -
 37
37 -
 38
38 -
 39
39 -
 40
40 -
 41
41 -
 42
42 -
 43
43 -
44
-
45
-
46
-
47
-
48
-
49
-
50
-
51
-
52
-
53
-
54
-
55
-
56
-
57
-
58
-
59
-
60
-
61
-
62
-
63
-
64
-
65
-
66
-
67
-
68
-
69
-
70
-
71
-
72
-
73
-
74
-
75
-
76
-
77
-
78
-
79
-
80
-
81
-
82
-
83
-
84
-
85
-
86
-
87
-
88
-
89
-
90
-
91
-
92
-
93
-
94
-
95
-
96
-
97
-
98
-
99
-
100
-
101
-
102
-
103
-
104
-
105
-
106
-
107
-
108
-
109
-
110
-
111
-
112
-
113
-
114
-
115
-
116
-
117
-
118
-
119
-
120
-
121
-
122
-
123
-
124
-
125
-
126
-
127
-
128
-
129
-
130
-
131
-
132
-
133
-
134
-
135
-
136
-
137
-
138
-
139
-
140
-
141
-
142
-
143
-
144
-
145
-
146
-
147
-
148
-
149
-
150
-
151
-
152
-
153
-
154
-
155
-
156
-
157
-
158
-
159
-
160
-
161
-
162
-
163
-
164
-
165
-
166
-
167
-
168
-
169
-
170
-
171
-
172
-
173
-
174
-
175
-
176
-
177
-
178
-
179
-
180
 |
 |
