Oki C5200ne Computer Connections & Software Install Guide - Page 5
Windows TCP/IP Network Installation: Model C5200n, Included Network Software, Set Up the Network - c5200n driver
 |
View all Oki C5200ne manuals
Add to My Manuals
Save this manual to your list of manuals |
Page 5 highlights
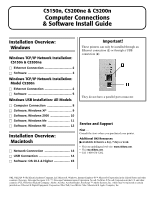
Windows TCP/IP Network Installation: Model C5200n Software Note: Installing a printer on a network is best handled by someone familiar with networks (such as a network Administrator). For more detailed information, see the OkiLAN User's Guide on the Driver CD supplied with your printer. Included Network Software Your Driver CD includes the following network software: Oki LPR Supports TCP/IP printing. Creates an OKI Print Port and installs a pop-up utility to monitor the printer status. Admin Mgr / Quick Setup Utility Use this to set up the various computers on your network for use with the printer. PrintSuperVision Provides access to network printer data for monitoring, reporting and managing networked printers. • Installs on either IIS or PWS Microsoft Web servers. Job Accounting Tracks network printer usage by job, user, or Account ID for internal reports and bill-back purposes. Network Printer Status Creates an additional STATUS tab in the printer Properties dialog box. Set Up the Network Print the Menu Map This will provide information on the printer's IP Address which is needed to set the printer up on the network. □ With the printer turned on, press +. □ Press ENTER. □ Press ENTER. The MenuMap prints. □ Look for the IP Address under TCP/IP Configuration. Run The Admin Mgr / Quick Setup Utility □ Insert the Drivers CD supplied with your printer in the CD-ROM drive. The CD will autorun. (If it doesn't, click Start → Run → Browse. Browse to your CD-ROM drive, double-click Install.exe, click OK.) □ The License Agreement appears, click Next. □ Select your language. □ The Menu Installer Software Installation dialog box appears. Click the Network Software button. □ Click the Installation/Config button. □ Click the Admin Mgr / Quick Setup button. □ The OkiLAN 98100e Softnic Setup Utility dialog box appears. Select your language. □ Select from the following buttons: • Please read before using: Readme file containing information and instructions for this utility. • OkiLAN 8100e Softnic Standard Setup: if you are experienced in network setup and want access to all the setting options, click this button and follow the on-screen instructions for completing the installation. • OkiLAN 8100e Softnic Quick Setup: This setup is for less experienced users and does not provide as many setting options as the Standard Setup. To use Quick Setup, click this button and follow the steps below. □ The Welcome dialog box appears. Click Next. □ If the Ethernet Address information does not automatically appear, click Search. □ Click the Ethernet information displayed, then click Next. □ Select Yes for TCP/IP protocol and click Next. (continued on next page) 5
-
 1
1 -
 2
2 -
 3
3 -
 4
4 -
 5
5 -
 6
6 -
 7
7 -
 8
8 -
 9
9 -
 10
10 -
 11
11 -
12
-
13
-
14
-
15
-
16
 |
 |
