Nikon 8312 Instruction Manual - Page 4
Mounting on a tripod regular type for camera, Objective lens cap snap-on type, Lens hood, Attaching - prostaff
 |
UPC - 018208083121
View all Nikon 8312 manuals
Add to My Manuals
Save this manual to your list of manuals |
Page 4 highlights
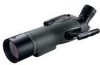
Nomenclature/Composition En Es Please refer to the numbered images on page 3. Fr Pt 1 Objective lens 2 Lens hood 3 Aiming line 4 Body 5 Focusing knob 6 Eyepiece (optional accessory) 7 Mount cap 8 Lens mount (bayonet) 9 Tripod mount !p Objective lens cap Operation 1 Mounting on a tripod (regular type for camera) • The Fieldscope is designed to be used with a tripod. Align the screw of the tripod with the tripod mount of the Fieldscope, and firmly tighten the screw. Choose a solid tripod of medium size or larger, that can stand the weight of the Fieldscope wind pressure, as well as being vibration-free. 2 Objective lens cap (snap-on type) • Before use, remove the objective lens cap from the objective tube. • When not in use, snap the cap onto the objective tube. Items supplied ・Main body x 1 ・Objective lens cap x 1 ・Mount cap x 1 ・Stay-on case x 1 ・Case strap (removable) x 1 6 3 Lens hood (Fig. 1) • To avoid diffused reflection in backlit conditions, prevent water droplets on the objective lens and to protect it, slide the lens hood outward until it stops. • To retract the lens hood, slide the lens hood in toward the body until it stops. After the lens hood has been fully retracted, re-attach the objective lens cap to the objective tube. Fig. 1 Lens hood Outward Inward En Es Fr Pt 4 Attaching the SEP-25, SEP-38W or SEP-20-60 eyepiece. • Remove the mount cap, which protects the lens mount. • To attach the eyepiece, align the index marks on the eyepiece and the main body. Next, insert the eyepiece into the mount and turn counterclockwise until you hear it "click." (Fig. 2) • To remove the eyepiece lens, turn the eyepiece clockwise while pushing the release button on the main body. (Fig. 3) *Spotting Scope RAIII eyepieces (Bayonet type) can be used with the PROSTAFF 5 Fieldscope. Fig. 2 1 2 3 Index mark 1 Push 2 Turn counterclockwise 3 Push release button 4 Turn clockwise 4 Fig. 3 Release button 7
-
 1
1 -
 2
2 -
 3
3 -
 4
4 -
 5
5 -
 6
6 -
 7
7 -
 8
8 -
 9
9 -
 10
10 -
11
-
12
-
13
-
14
-
15
-
16
-
17
-
18
-
19
 |
 |
