Netgear XSM4324S Hardware Installation Guide - Page 61
Step 9: Apply AC power and check the LEDs
 |
View all Netgear XSM4324S manuals
Add to My Manuals
Save this manual to your list of manuals |
Page 61 highlights
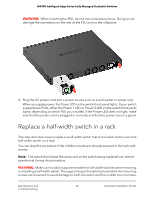
M4300 Intelligent Edge Series Fully Managed Stackable Switches Step 9: Apply AC power and check the LEDs The switch does not provide an on/off switch. The power cord connection controls the power. Before connecting the power cord, select an AC outlet that is not controlled by a wall switch, which can turn off power to the switch. To apply AC power and check the LEDs: 1. Connect the end of the power cord to the power receptacle on the power supply unit (PSU) on back of the switch. If you installed two PSUs, do this for both PSUs. 2. Check to see that the system LEDs on the front panel function as expected. For more information about the LEDs, see the following sections: • LEDs, M4300 series full 10G models on page 21 • LEDs, M4300 series 1G models with 10G uplinks on page 29 • LEDs, M4300X series full 10G models with RJ45/SFP+ combo ports on page 38 When you apply power, the Power LED on the switch front panel lights. If the Power LED does not light, check that the power cord is plugged in correctly and that the power source is good. If you installed two PSUs, the Power 1 LED on the front panel is associated with the PSU 1 bay and the Power 2 LED is associated with the PSU 2 bay. If a Power LED does not light, check to see that the power cord is plugged in correctly and that the power source is good. Installation 61 Hardware Installation Guide
-
 1
1 -
2
-
3
-
4
-
5
-
6
-
7
-
8
-
9
-
10
-
11
-
12
-
13
-
14
-
15
-
16
-
17
-
18
-
19
-
20
-
21
-
22
-
23
-
24
-
25
-
26
-
27
-
28
-
29
-
30
-
31
-
32
-
33
-
34
-
35
-
36
-
37
-
38
-
39
-
40
-
41
-
42
-
43
-
44
-
45
-
46
-
47
-
48
-
49
-
50
-
51
-
52
-
53
-
54
-
55
-
 56
56 -
 57
57 -
 58
58 -
 59
59 -
 60
60 -
 61
61 -
 62
62 -
 63
63 -
 64
64 -
 65
65 -
 66
66 -
67
-
68
-
69
 |
 |