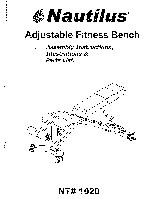
Nautilus NT 1020 Assembly Manual - Page 2
Assembly, Instructions, Adjustable, Fitness, Bench
 |
View all Nautilus NT 1020 manuals
Add to My Manuals
Save this manual to your list of manuals |
Page 2 highlights
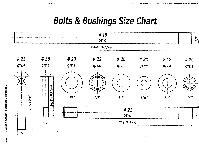
Assembly Instructions for the Nautilus® Adjustable Fitness Bench • A flat area of 6' x 3' will be required to assemble and properly use the Nautilus® Adjustable Fitness Bench. • You will need the following tools to complete the assembly: • 7/32" Allen Wrench • 5/16" Allen Wrench • 1" Box Wrench • 3/4" Box Wrench • Floor padding, such as cardboard, to avoid scratching your floor during assembly. • A good pair of scissors will be helpful in separating parts from one another while removing from the cartons. 1. Insert the carriage bolts (22) into the front base (2) and the rear base (4) as shown. Insert each carriage bolt until the square head of the bolt engages the square hole in the metal. Rotate the front base (2) and the rear base (4) so that the head of the carriage bolt is on the bottom. 2. Attach the main frame (1) to the front base (2) and the rear base (4). Position the main frame (1) onto the carriage bolts (22) which protruding through the front base (2) and the rear base (4). Secure the carriage bolts with four washers (18) and four nuts (20). Tighten the bolts securely. 3. Attach the two backrest support bars (5) and the seat support bars (12) to the main frame (1) using a stud (19), two washers (23) and two nuts (25) as shown. Be sure the eccentric axle sleeves are only side of the cushions as shown and the stud (19) is centered and then tighten the nuts (25) to where you still can rotate the support bars (5, 12) freely. 4. Attach the seat adjusting lever (7) located on the main frame (1) to the two seat support bars (12) using a stud (19), two washers (23) and two nuts (25) as shown. Be sure the stud (19) is centered and then tighten the nuts (25) to where you still can rotate the lever (7) freely. 5. Attach the seat cushion (8) to the two seat support bars (12) using four bolts (33) and four washers (31) as shown. Tighten the bolt securely. 6. Attach the backrest cushion (6) to the two backrest support bars (5) using four bolts (33) and four washers (31) as shown. Tighten the bolts securely. 7. Insert a screw down pull pin (9) into the threaded lug on the front vertical tube of main frame (1) and screw in place. Do not tighten all the way down. 8. Slide the leg frame (3) into the front vertical tube of main frame (1) as shown. Pull the handle on the screw down pull pin (9) previously installed. This will allow the leg frame (3) to slide down. Release the pin to lock in place and secure by tightening. 9. Slide the roller support tube (11) through the hole in the leg frame (3). Center the roller support tube (11) and slide a foam roller (14) onto each end of the roller support tube (11). 10. Insert a plastic roller retaining cap (17) into each end of the roller support tube (11). 11. Check all bolts and tighten as needed. Nautilus® Adjustable Fitness Bench NT# 1020
-
 1
1 -
 2
2 -
 3
3 -
 4
4 -
 5
5
 |
 |
