NEC NP-ME361X Users Manual - Page 58
(2) Projecting images stored in a USB memory device, Turn on the projector.
 |
View all NEC NP-ME361X manuals
Add to My Manuals
Save this manual to your list of manuals |
Page 58 highlights
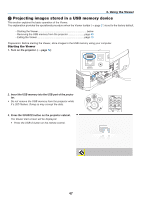
4. Using the Viewer ❷ Projecting images stored in a USB memory device This section explains the basic operation of the Viewer. The explanation provides the operational procedure when the Viewer toolbar (→ page 51) is set to the factory default. - Starting the Viewer below - Removing the USB memory from the projector page 49 - Exiting the Viewer page 49 Preparation: Before starting the Viewer, store images to the USB memory using your computer. Starting the Viewer 1. Turn on the projector. (→ page 12) 2. Insert the USB memory into the USB port of the projector. • Do not remove the USB memory from the projector while it's LED flashes. Doing so may corrupt the data. 3. Press the SOURCE button on the projector cabinet. The Viewer start screen will be displayed. • Press the USB-A button on the remote control. 47
-
 1
1 -
2
-
3
-
4
-
5
-
6
-
7
-
8
-
9
-
10
-
11
-
12
-
13
-
14
-
15
-
16
-
17
-
18
-
19
-
20
-
21
-
22
-
23
-
24
-
25
-
26
-
27
-
28
-
29
-
30
-
31
-
32
-
33
-
34
-
35
-
36
-
37
-
38
-
39
-
40
-
41
-
42
-
43
-
44
-
45
-
46
-
47
-
48
-
49
-
50
-
51
-
52
-
 53
53 -
 54
54 -
 55
55 -
 56
56 -
 57
57 -
 58
58 -
 59
59 -
 60
60 -
 61
61 -
 62
62 -
 63
63 -
64
-
65
-
66
-
67
-
68
-
69
-
70
-
71
-
72
-
73
-
74
-
75
-
76
-
77
-
78
-
79
-
80
-
81
-
82
-
83
-
84
-
85
-
86
-
87
-
88
-
89
-
90
-
91
-
92
-
93
-
94
-
95
-
96
-
97
-
98
-
99
-
100
-
101
-
102
-
103
-
104
-
105
-
106
-
107
-
108
-
109
-
110
-
111
-
112
-
113
-
114
-
115
-
116
-
117
-
118
-
119
-
120
-
121
-
122
-
123
-
124
-
125
-
126
-
127
-
128
-
129
-
130
-
131
-
132
-
133
 |
 |
