NEC IB554Q-2.1 User Manual - Page 12
InfinityBoard Assembly Instruction, Installing the OPS Slot-in PC
 |
View all NEC IB554Q-2.1 manuals
Add to My Manuals
Save this manual to your list of manuals |
Page 12 highlights
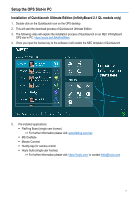
InfinityBoard Assembly Instruction Installing the OPS Slot-in PC A 2 3 4 5 NOTE: Make sure to write down the Windows 10 license code which can be found on the rearside of the OPS slot-in PC. Follow the instruction described in picture 2 to 5: 1. Turn off the main power switch on the monitor. 2. Remove the attached slot cover by unscrewing the installed screws (picture 2), sliding to right (picture 3) and moving up (picture 4). 3. Insert the OPS PC into the monitor and fix it with the removed screws (picture 5). NOTE: Do not apply excessive force to manipulate the OPS PC before fixing it with screws. Make sure that the OPS PC is inserted into the slot in the correct orientation. CAUTION: Ensure the OPS PC is attached by the removed screws. Otherwise, the OPS PC may fall out and expose you to danger. (Recommended Fasten Force: 139 - 189N•cm). 12
-
 1
1 -
2
-
3
-
4
-
5
-
6
-
 7
7 -
 8
8 -
 9
9 -
 10
10 -
 11
11 -
 12
12 -
 13
13 -
 14
14 -
 15
15 -
 16
16 -
 17
17 -
18
-
19
-
20
-
21
-
22
-
23
-
24
-
25
-
26
-
27
 |
 |
