Maytag MGT8820DS Use & Care Guide - Page 9
Oven Temperature Control, Control Lockout
 |
View all Maytag MGT8820DS manuals
Add to My Manuals
Save this manual to your list of manuals |
Page 9 highlights
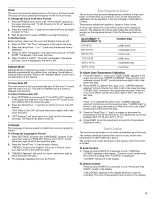
Clock The clock can be set to display time in a 12-hour or 24-hour format. The clock is factory preset at the factory for the 12-hour format. To Change the Clock to 24-Hour Format: 1. Press SETTINGS seven times until "12/24 HOUR" appears in the upper text area and "12 HR. Press (+) for 24 Hr" appears in the lower text area. 2. Press the Temp/Time "+" pad once to select 24 hour and again to select 12 hour. 3. Wait 30 seconds or press CANCEL to accept the setting. To Set the Clock: Before setting, make sure the oven and Kitchen Timer are off. 1. Press CLOCK. "Set Time" will appear in the upper text area. 2. Press the Temp/Time "+" or "-" pads until the desired time is displayed. 3. "Press CLOCK" will appear in the upper text area and "or Push START" will appear in the lower text area. 4. Press CLOCK or START. "Time Set" will appear in the upper text area. Once it disappears, the time is set. Sabbath Mode Sabbath Mode configures the range to conform to Star-K Jewish Sabbath requirements for a Bake cycle, including Timed Bake or Delayed Bake functions. Refer to the "Sabbath Mode" section for a full description of this feature. 12-Hour Auto Off The oven control is set to automatically shut off the oven 12 hours after the oven turns on. This will not interfere with any timed or delayed cook function. To Cancel 12-Hour Auto Off: 1. Press SETTINGS nine times until "12 Hr AUTO_OFF" appears in the upper text area and "ON. Press (+) for Off" scrolls twice from right to left in the lower text area. 2. Press the Temp/Time "+" pad to turn off the 12-hour Auto Off feature. "OFF. Press (+) for ON" will scroll twice from right to left in the lower text area. 3. "OFF Selected" will scroll twice from right to left in the lower text area. The feature has been turned off. Language The Language is factory preset to English but can be changed to French. To Change the Language to French: 1. Press SETTINGS 10 times until "LANGUAGE" appears in the upper text area and "ENGLISH. Press (+) for French" scrolls twice from right to left in the lower text area. 2. Press the Temp/Time "+" pad to select French. "FRENCH. Press (+) for English" will scroll, in French, twice from right to left in the lower text area. 3. "FRENCH Selected" will scroll, in French, twice from right to left in the lower text area. 4. The language displayed will now be French. Oven Temperature Control The oven provides accurate temperatures; however, it may cook faster or slower than your previous oven, so the temperature calibration can be adjusted. It can be changed in Fahrenheit or Celsius. Temperature adjustment applies to upper or lower ovens. A minus sign means the oven will be cooler by the displayed amount. The absence of a minus sign means the oven will be warmer by the displayed amount. Use the following chart as a guide. ADJUSTMENT °F (ADJUSTMENT °C) COOKS FOOD 10°F (6°C) ...a little more 20°F (12°C) ...moderately more 30°F (17°C) ...much more -10°F (-6°C) ...a little less -20°F (-12°C) ...moderately less -30°F (-17°C) ...much less To Adjust Oven Temperature Calibration: 1. Press SETTINGS 11 times until "TEMP CALIB" appears in the upper text area and "UPPER CALIBRATE. Press (+) for Lower calibrate or push START" scrolls twice from right to left in the lower text area. 2. Press START to calibrate the upper oven. "UPPER Calibrate selected" will scroll twice from right to left in the lower text area. "UPPER Calib" is shown in the upper text area and "Press (+) or (-) to set offset" scrolls twice from right to left in the lower text area. OR Press "+" to calibrate the lower oven. "LOWER Calibrate selected" scrolls twice in the lower text area. "LOWER Calib" is shown in the upper text area and "Press (+) or (-) to set offset" scrolls twice in the lower text area. 3. Press the Temp/Time "+" pad to increase or decrease the temperature in 5°F (3°C) increments. The adjustment can be set between 30°F (17°C) and -30°F (-17°C). 4. Press START to set the adjustment and exit the Temperature Calibration menu. Control Lockout The control can be locked out to avoid unintended use of the oven. The control cannot be locked if the oven is in use, or the oven temperature is 400°F (205°C) or above. The current time of day will remain in the display when the control is locked. To Lock Control: 1. Press and hold START for 3 seconds or until "CONTROL LOCKED" appears in the display. "Control locked" scrolls while the control is locking, then "LOCKED" is displayed. "LOCKED" remains lit in the display. To Unlock Control: Press and hold START for 3 seconds or until "Press and hold START" scrolls in the display. "UNLOCKING" appears in the display while the control is unlocking. The time of day appears and remains in the display. 9
-
 1
1 -
2
-
3
-
 4
4 -
 5
5 -
 6
6 -
 7
7 -
 8
8 -
 9
9 -
 10
10 -
 11
11 -
 12
12 -
 13
13 -
 14
14 -
15
-
16
-
17
-
18
-
19
-
20
-
21
-
22
-
23
-
24
-
25
-
26
-
27
-
28
-
29
-
30
-
31
-
32
-
33
-
34
-
35
-
36
-
37
-
38
-
39
-
40
-
41
-
42
-
43
-
44
-
45
-
46
-
47
-
48
 |
 |
