Marantz NR1506 Owner's Manual in English - Page 2
Connections, Playback - remote
 |
View all Marantz NR1506 manuals
Add to My Manuals
Save this manual to your list of manuals |
Page 2 highlights
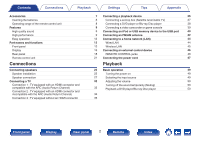
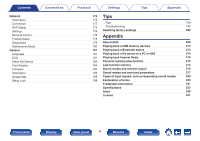
Contents Connections Playback Settings Tips Appendix Accessories Inserting the batteries Operating range of the remote control unit Features High quality sound High performance Easy operation Part names and functions Front panel Display Rear panel Remote control unit Connections Connecting speakers Speaker installation Speaker connection Connecting a TV Connection 1 : TV equipped with an HDMI connector and compatible with the ARC (Audio Return Channel) Connection 2 : TV equipped with an HDMI connector and incompatible with the ARC (Audio Return Channel) Connection 3 : TV equipped without an HDMI connector 7 Connecting a playback device 36 8 Connecting a set-top box (Satellite tuner/cable TV) 37 8 Connecting a DVD player or Blu-ray Disc player 38 9 Connecting a video camcorder or game console 39 9 Connecting an iPod or USB memory device to the USB port 40 9 Connecting an FM/AM antenna 42 12 Connecting to a home network (LAN) 44 13 Wired LAN 44 13 Wireless LAN 45 16 Connecting an external control device 46 18 REMOTE CONTROL jacks 46 21 Connecting the power cord 47 Playback 25 Basic operation 49 25 Turning the power on 49 27 Selecting the input source 49 32 Adjusting the volume 50 Turning off the sound temporarily (Muting) 50 33 Playback a DVD player/Blu-ray Disc player 50 34 35 Front panel Display Rear panel 2 Remote Index
-
 1
1 -
 2
2 -
 3
3 -
 4
4 -
 5
5 -
 6
6 -
 7
7 -
 8
8 -
9
-
10
-
11
-
12
-
13
-
14
-
15
-
16
-
17
-
18
-
19
-
20
-
21
-
22
-
23
-
24
-
25
-
26
-
27
-
28
-
29
-
30
-
31
-
32
-
33
-
34
-
35
-
36
-
37
-
38
-
39
-
40
-
41
-
42
-
43
-
44
-
45
-
46
-
47
-
48
-
49
-
50
-
51
-
52
-
53
-
54
-
55
-
56
-
57
-
58
-
59
-
60
-
61
-
62
-
63
-
64
-
65
-
66
-
67
-
68
-
69
-
70
-
71
-
72
-
73
-
74
-
75
-
76
-
77
-
78
-
79
-
80
-
81
-
82
-
83
-
84
-
85
-
86
-
87
-
88
-
89
-
90
-
91
-
92
-
93
-
94
-
95
-
96
-
97
-
98
-
99
-
100
-
101
-
102
-
103
-
104
-
105
-
106
-
107
-
108
-
109
-
110
-
111
-
112
-
113
-
114
-
115
-
116
-
117
-
118
-
119
-
120
-
121
-
122
-
123
-
124
-
125
-
126
-
127
-
128
-
129
-
130
-
131
-
132
-
133
-
134
-
135
-
136
-
137
-
138
-
139
-
140
-
141
-
142
-
143
-
144
-
145
-
146
-
147
-
148
-
149
-
150
-
151
-
152
-
153
-
154
-
155
-
156
-
157
-
158
-
159
-
160
-
161
-
162
-
163
-
164
-
165
-
166
-
167
-
168
-
169
-
170
-
171
-
172
-
173
-
174
-
175
-
176
-
177
-
178
-
179
-
180
-
181
-
182
-
183
-
184
-
185
-
186
-
187
-
188
-
189
-
190
-
191
-
192
-
193
-
194
-
195
-
196
-
197
-
198
-
199
-
200
-
201
-
202
-
203
-
204
-
205
-
206
-
207
-
208
-
209
-
210
-
211
-
212
-
213
-
214
-
215
-
216
-
217
-
218
-
219
-
220
-
221
-
222
-
223
-
224
-
225
-
226
-
227
-
228
-
229
-
230
-
231
-
232
-
233
-
234
-
235
-
236
-
237
-
238
-
239
-
240
-
241
-
242
-
243
-
244
-
245
-
246
-
247
-
248
-
249
 |
 |
