Makita XT706 Instruction Manual - Page 4
Assembly, Maintenance
 |
View all Makita XT706 manuals
Add to My Manuals
Save this manual to your list of manuals |
Page 4 highlights
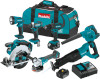
1 1. Pointer 2. Air volume adjusting dial 3. Switch trigger 3 2 008313 To start the tool, simply pull the switch trigger. Air volume is increased by increasing pressure on the switch trigger. Release the switch trigger to stop. Air volume adjusting dial Air volume can be adjusted to any of three settings by turning the adjusting dial with the switch trigger fully depressed. Refer to the table below for the relationship between the number on the dial and the air volume. Dust suction 1 2 1. Dust bag 2. Blower outlet 3. Suction inlet 4. Nozzle 3 4 012984 For dust suction, fit nozzle onto suction inlet and dust bag onto blower outlet. After the bag fills with dust, empty the contents of the dust bag into a dust bin by releasing the fastener. 1. Fastener Number on the dial Air volume 3 High 2 Medium 1 008312 Low CAUTION: • Use the adjusting dial only after the switch trigger returns to the "OFF" position. Turning the dial before the trigger returns may damage the tool. • If the tool is operated continuously until the battery cartridge has discharged, rest the tool for at least 15 minutes before proceeding with a fresh battery. ASSEMBLY CAUTION: • Always be sure that the tool is switched off and the battery cartridge is removed before carrying out any work on the tool. Blowing 1 2 1. Nozzle 2. Blower outlet 1 007170 CAUTION: • Empty the dust bag before it becomes too full, or the suction force weakens. NOTICE: The garden nozzle (optional accessory) is intended for blowing use only. Do not use garden nozzle for suction. MAINTENANCE CAUTION: • Always be sure that the tool is switched off and the battery cartridge is removed before attempting to perform inspection or maintenance. • Never use gasoline, benzine, thinner, alcohol or the like. Discoloration, deformation or cracks may result. Cleaning 008310 For dust blowing, attach nozzle to blower outlet, turning clockwise to lock it in place. To remove the nozzle, turn it counterclockwise. 012985 From time to time, wipe off the outside of the tool using a cloth dampened in soapy water. Never use gasoline, thinner or the like, or discoloration and/or cracks can take place. 4
-
 1
1 -
 2
2 -
 3
3 -
 4
4 -
 5
5 -
 6
6 -
 7
7 -
 8
8 -
 9
9 -
 10
10 -
11
-
12
-
13
-
14
-
15
-
16
 |
 |
