Makita DML805 Instruction Manual - Page 5
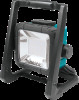
Assembly, Functional Description - 2 led worklight
 |
View all Makita DML805 manuals
Add to My Manuals
Save this manual to your list of manuals |
Page 5 highlights
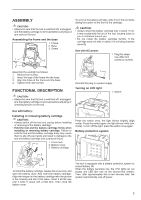
ASSEMBLY CAUTION: • Always be sure that the tool is switched off, unplugged, and the battery cartridge is removed before carrying out any work on the tool. Assembling the frame and the base 1. Frame 2. Base 3. Screw 1 2 To remove the battery cartridge, slide it from the tool while sliding the button on the front of the cartridge. CAUTION: • Always install the battery cartridge fully in place. If not, it may accidentally fall out of the tool, causing injury to you or someone around you. • Do not install the battery cartridge forcibly. If the cartridge does not slide in easily, it is not being inserted correctly. Use with AC power: 1. Plug (the shape may differ from country to country) 3 Assemble the worklight as follows: 1. Remove the screws. 2. Insert the legs of the frame into the base. 3. Align the holes of the frame and the base. 4. Tighten them with screws. FUNCTIONAL DESCRIPTION CAUTION: • Always be sure that the tool is switched off, unplugged, and the battery cartridge is removed before adjusting or checking function on the tool. 1 Connect the plug to a power supply. Turning on LED light 1 1. Switch Use with battery: Installing or removing battery cartridge CAUTION: • Always switch off the tool and unplug before installing or removing of the battery cartridge. • Hold the tool and the battery cartridge firmly when installing or removing battery cartridge. Failure to hold the tool and the battery cartridge firmly may cause them to slip off your hands and result in damage to the tool and battery cartridge and a personal injury. 3 1. Cover lock 2. Battery cover 3. Battery cartridge Press the switch once, the light shines brightly (high mode). Press the switch again, the light shines mildly (low mode). To turn off the light, press the switch once again. Battery protection system 2 1 To install the battery cartridge, release the cover lock, and open the battery cover. And insert the battery cartridge. Align the tongue on the battery cartridge with the groove in the housing and slip it into place. Insert it all the way until it locks in place with a little click. Then close the battery cover. The tool is equipped with a battery protection system to extend battery life. When the battery becomes low, the LED lights go out except one LED (the one on the second line center). Then, after approximately five to ten minutes later, the system automatically cuts off power. 5
-
 1
1 -
 2
2 -
 3
3 -
 4
4 -
 5
5 -
 6
6 -
 7
7 -
 8
8 -
 9
9 -
 10
10 -
 11
11 -
12
-
13
-
14
-
15
-
16
-
17
-
18
-
19
-
20
 |
 |
