Magnavox CMWD2206 User manual, English (US) - Page 8
Preparation for Use - english manual
 |
View all Magnavox CMWD2206 manuals
Add to My Manuals
Save this manual to your list of manuals |
Page 8 highlights
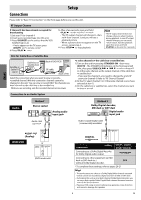
Preparation for Use Setup Turn on the Unit for the First Time VCR Operations described in this manual are mainly based on the remote control. 1 Turn on the TV and set it to channel 3. • If channel 3 has been already occupied for broadcasting, see "RF Output Channel" section on page 6. 2 Select your language when turning this unit on for the first time. Then press [B] to go to next step. LANGUAGE SELECT STANDBY-ON or B ENGLISH [ON] FRANCAIS ESPAÑOL 3 Press [B] to start Auto Set Up. CH 01 AUTO SET UP Do you connect the cable from the cable box or the satellite box to the unit's ANT-IN jack? YES NO Yes Press [MENU] to exit. • Refer to "Hint for Cable Box or Satellite Box" section on page 6. No Please wait for a few minutes. After scanning... • The tuner stops on the lowest memorized channel. • You can select only the channels memorized in this unit by using [SKIP/CH. G//K, H/L] (or [CHANNEL K//L]). • If "AUTO SET UP" appears on the TV screen again, check the cable con- nections. Then, press [B] once again. Hint • Repeat these steps only if either there was a power failure or this unit has been unplugged for more than 30 seconds. To Select a Channel You can select a channel by using the number buttons or [SKIP/CH. G/K, H/L]. Notes for using the number buttons: • When selecting cable channels which are higher than 99, enter channel numbers as a three-digit number. (for example: 117, press [1], [1], [7]) • You must precede single-digit channel numbers with a zero. (for example: 02, 03, 04 and so on) To Add or Delete Channels VCR 1 Press [MENU] to select "CHANNEL SET UP". Then press [B] to go to next step. MENU or - M E N U - TIMER PROGRAMMING AUTO REPEAT [OFF] B CHANNEL SET UP CLOCK SET LANGUAGE SELECT • If the clock is not set, the "CLOCK SET" screen appears when you press [MENU]. In this case, press [MENU] again. 2 Select "MANUAL SET UP". Then press [B] to go to next step. CHANNEL SET UP AUTO SET UP B MANUAL SET UP or 3 Select the channel to be added or deleted. or or or MANUAL SET UP CHANNEL 30 ADD (CATV) To Preset the Channel Again 1) Press [MENU] until the main menu appears. 2) Select "CHANNEL SET UP" by using [K/L], then press [B]. 3) Select "AUTO SET UP" by using [K/L], then press [B]. After scan- ning, the tuner stops on the lowest memorized channel. To Change the On-Screen Language 1) Press [MENU] until the main menu appears. 2) Select "LANGUAGE SELECT" by using [K/L], then press [B]. 3) Select "ENGLISH" , "FRANCAIS" or "ESPAÑOL" by using [K/ L] then press [CLEAR/C.RESET]. Hint • If you accidentally select Spanish or French and need English: Press [MENU] and choose SELEC. IDIOMA or SELECTION LANGUE. Press [B] and select ENGLISH. Finally, press [CLEAR/C.RESET]. • To add or delete channels in this unit, [SKIP/CH. G/K, H/L] button works on the channel number memorized in this unit, [K/L] works on all. Clock Setup VCR 1 Press [MENU] and select "CLOCK SET". Then press [B] to go to next step. MENU or - M E N U - TIMER PROGRAMMING AUTO REPEAT [OFF] CHANNEL SET UP B CLOCK SET LANGUAGE SELECT • If the clock is not set, the CLOCK SET screen appears when you press [MENU]. In this case, go to step 2. 2 Select the current month. Then press [B] to go to next step. or CLOCK SET MONTH DAY 10 / -- YEAR - - - - HOUR MINUTE -- : -- AM/PM - - 3 Select the current day. Then press [B] to go to next step. or CLOCK SET MONTH DAY 10 / 05 YEAR - - - - HOUR MINUTE -- : -- AM/PM - - 4 Select the current year. Then press [B] to go to next step. or 5 Select the current hour. Then press [B] to go to next step. or CLOCK SET MONTH DAY 10 / 05 YEAR 2 0 0 9 HOUR MINUTE -- : -- AM/PM - - CLOCK SET MONTH DAY YEAR 1 0 / 0 5 MON 2 0 0 9 HOUR MINUTE 05 : -- AM/PM - - 6 Select the current minute. Then press [B] to go to next step. or 7 Select "AM" or "PM". or 8 To exit the CLOCK SET screen CLOCK SET MONTH DAY YEAR 1 0 / 0 5 MON 2 0 0 9 HOUR MINUTE 05 : 40 AM/PM - - CLOCK SET MONTH DAY YEAR 1 0 / 0 5 MON 2 0 0 9 HOUR MINUTE 05 : 40 AM/PM P M AM B PM 4 Select "ADD" or "DELETE". or 5 To exit the menu CLEAR/ C. RESET MANUAL SET UP CHANNEL 30 DELETE (CATV) Hint • To go back one step, press [s] (during steps 2 to 7). • Your clock setting will be lost if either there is a power failure or this unit has been unplugged for more than 30 seconds. -8- EN
-
 1
1 -
2
-
 3
3 -
 4
4 -
 5
5 -
 6
6 -
 7
7 -
 8
8 -
 9
9 -
 10
10 -
 11
11 -
 12
12 -
 13
13 -
14
-
15
-
16
-
17
-
18
-
19
-
20
-
21
-
22
-
23
-
24
-
25
-
26
 |
 |
