LiftMaster CSW200101U CSW200501U Setup and Operation Manual - Page 15
Adjustment, Adjust The Limits
 |
View all LiftMaster CSW200101U manuals
Add to My Manuals
Save this manual to your list of manuals |
Page 15 highlights
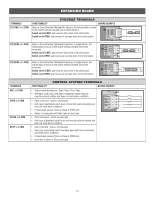
ADJUSTMENT To reduce the risk of SEVERE INJURY or DEATH: • Without a properly installed safety reversal system, persons (particularly small children) could be SERIOUSLY INJURED or KILLED by a moving gate. • Too much force on gate will interfere with proper operation of safety reversal system. • NEVER increase force beyond minimum amount required to move gate. • NEVER use force adjustments to compensate for a binding or sticking gate. • If one control (force or travel limits) is adjusted, the other control may also need adjustment. • After ANY adjustments are made, the safety reversal system MUST be tested. Gate MUST reverse on contact with a rigid object. ADJUST THE LIMITS The adjustments allow you to set where the gate will stop in the open and close position. The force is adjusted automatically when you set the limits but should be fine tuned using the FORCE dial on the control board (refer to Force Dial section) to compensate for environmental changes. NOTE: The Test Buttons on the control board will not work until the limits have been set. For dual gate applications the limits will have to be set for each operator. The gate MUST be attached to the operator before setting the limits and force. For slide gate applications the limits MUST be set at least four feet apart. HANDING OPEN RIGHT OPEN LEFT If the operator is installed on the right side of the drive when looking out of the property, a swing gate will swing to the right (turn counter clockwise) when opening and a slide gate will slide to the right when opening. NOTE: For gates installed on the outside of the property, the setting will be opposite. Determine the direction by looking towards the property from the outside. OPEN LEFT OPEN RIGHT HANDING If the operator is mounted on the left side of the drive when looking out of the property, a swing gate will swing to the left (turn clockwise) when opening and a slide gate will slide to the left when opening. NOTE: For gates installed on the outside of the property, the setting will be opposite. Determine the direction by looking towards the property from the outside. ADJUST THE LIMITS 1. Make sure the gate is closed. 2. Press and release both the OPEN LEFT and OPEN RIGHT handing buttons until both handing LEDs start to flash and the operator beeps. 3. Press and release either the OPEN RIGHT or OPEN LEFT button depending on which direction the gate should open. The corresponding handing LED will turn solid. 4. Press and release the OPEN test button to open the gate. 5. Press the STOP test button when the desired OPEN limit is reached. Adjust the limit cam or limit nut so it makes contact with the OPEN limit switch at this position. If the gate stops early, move the limit cam or limit nut to allow for additional travel. 6. Press and release the CLOSE test button to close the gate. 7. Press the STOP test button when the desired CLOSE limit is reached. Adjust the limit cam or limit nut so it makes contact with the CLOSE limit switch at this position. If the gates stops early, move the limit cam or limit nut to allow for additional travel. 8. Run the operator one full cycle using the test buttons. The initial forces and run distance will be set during this cycle. If the gate stops early and the operator has error number 50 (maximum run distance), repeat steps 1-4 to set the run distance again. Model SL3000U Limit Nuts 14 Limit Switches Model CSW200U Limit Cams Open Limit Switch Close Limit Switch NOTE: The OPEN limit switch is always on the top and the CLOSE limit switch is always on the bottom.
-
 1
1 -
2
-
3
-
4
-
5
-
6
-
7
-
8
-
9
-
 10
10 -
 11
11 -
 12
12 -
 13
13 -
 14
14 -
 15
15 -
 16
16 -
 17
17 -
 18
18 -
 19
19 -
 20
20 -
21
-
22
-
23
-
24
-
25
-
26
-
27
-
28
-
29
-
30
-
31
-
32
-
33
-
34
-
35
-
36
-
37
-
38
-
39
-
40
-
41
-
42
-
43
-
44
-
45
-
46
-
47
-
48
-
49
-
50
-
51
-
52
-
53
-
54
-
55
-
56
-
57
-
58
-
59
-
60
 |
 |
