LiftMaster CAPXLV Quick Start Guide - English French Spanish - Page 3
Installation
 |
View all LiftMaster CAPXLV manuals
Add to My Manuals
Save this manual to your list of manuals |
Page 3 highlights
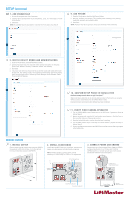
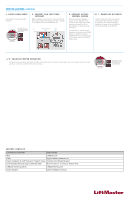
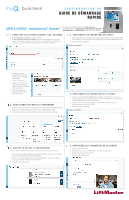
INSTALLATION (CONTINUED) 4. ENTER ADMIN MODE Enter Admin mode using the DIP switch #1. 5. CONNECT AND CONFIGURE INTERNET Make necessary connections for Internet at the job site (wired or Wi-Fi) and configure network settings in the CAPXLV Admin mode Network tab. DIP switch #1 on the Power/Internet board. The ON position enters Admin mode. ON ON Power and Ethernet Wi-Fi ON Position 6. CONNECT ACCESS CONTROL WIRING Route all necessary Wiegand, request to exit, and other input wiring into the CAPXLV and make necessary connections to the gate operator or mag lock being controlled. If connecting to LiftMaster Gate Operators wirelessly, press LEARN Button on operator twice and LEARN Button for the desired relay in the Outputs tab in the CAPXLV Admin mode. 7. DOWNLOAD DATABASE Select the Internet connection method and confirm valid connection. After a few minutes, the welcome message, background image, time, and directory will be downloaded to the CAPXLV. 8. VALIDATE PROPER OPERATION Exit Admin mode using the DIP switch #1. Make a test phone call, test each credential type, and ensure proper behavior of each gate/door connected to CAPXLV. Test video functions. ON DIP switch #1 on the ON Power/Internet board. The OFF position exits Admin mode. OFF Position SUPPORT CONTACTS LIFTMASTER SUPPORT RESOURCES Web LiftMaster.com FAQs Support.Dealer.LiftMaster.com Dealer Installation & myQ® Business™ Support Videos YouTube.com/LiftmasterSupport Commercial/professional support: 800-528-2806 Mon-Fri 5:00 a.m. to 6:00 p.m. Arizona Time LiftMaster training academy LiftMasterTraining.com Dealer Extranet partner.LiftMaster.com/login
-
 1
1 -
 2
2 -
 3
3 -
 4
4 -
 5
5 -
 6
6 -
 7
7 -
 8
8 -
 9
9 -
10
-
11
-
12
 |
 |
