LiftMaster CAPAC LiftMaster CAPAC Wiring Diagram - English French Spanish
LiftMaster CAPAC Manual
 |
View all LiftMaster CAPAC manuals
Add to My Manuals
Save this manual to your list of manuals |
LiftMaster CAPAC manual content summary:
- LiftMaster CAPAC | LiftMaster CAPAC Wiring Diagram - English French Spanish - Page 1
For the complete installation manual go to: https://support.partner.liftmaster.com/s/ community-access-support CAPAC myQ® SMART ACCESS MUST be cleared and secured, at that time the unit may be returned to service. • CAPAC MUST be properly grounded and connected in accordance with national and local - LiftMaster CAPAC | LiftMaster CAPAC Wiring Diagram - English French Spanish - Page 2
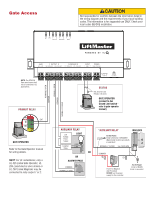
STATUS EOL (End of Line) Resistor (1k ohm) GATE OPERATOR (connect to Aux Closed Limit switch refer to gate operator manual) EXIT GATE OPERATOR Refer to the Gate Operator manual for wiring details. NOTE: For UL installations, only a UL 325 Listed Gate Operator, UL 294 Listed electric door strikes - LiftMaster CAPAC | LiftMaster CAPAC Wiring Diagram - English French Spanish - Page 3
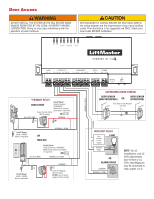
Door Access DO NOT INSTALL THE SYSTEM IN THE FAIL SECURE MODE UNLESS PERMITTED BY THE LOCAL AUTHORITY HAVING JURISDICTION. Doing so may cause interference with the operation of panic hardware. Not responsible for conflicts between the information listed in the wiring diagram and the requirements - LiftMaster CAPAC | LiftMaster CAPAC Wiring Diagram - English French Spanish - Page 4
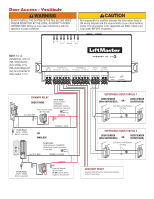
Door Access - Vestibule DO NOT INSTALL THE SYSTEM IN THE FAIL SECURE MODE UNLESS PERMITTED BY THE LOCAL AUTHORITY HAVING JURISDICTION. Doing so may cause interference with the operation of panic hardware. Not responsible for conflicts between the information listed in the wiring diagram and the - LiftMaster CAPAC | LiftMaster CAPAC Wiring Diagram - English French Spanish - Page 5
installation. This equipment generates, uses and can radiate radio frequency energy and, if not installed and used in accordance with the instructions, may cause harmful interference to radio communications. However, there is no guarantee that interference will not occur in a particular installation - LiftMaster CAPAC | LiftMaster CAPAC Wiring Diagram - English French Spanish - Page 6
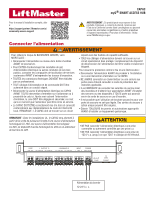
installation complet, aller à : https://support.partner.liftmaster.com/s/ community-access-support Connecter l'alimentation CAPAC myQ® SMART ACCESS sécurisée; ce n'est qu'à ce moment que l'actionneur peut être remis en service. • Le CAPAC DOIT ÊTRE correctement mis à la terre et connecté conformé - LiftMaster CAPAC | LiftMaster CAPAC Wiring Diagram - English French Spanish - Page 7
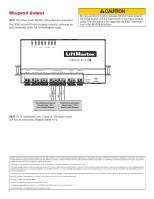
Accès à la barrière Non responsable des conflits entre l'information indiquée dans le schéma de câblage et les exigences des codes du bâtiment de votre région. Cette information est fournie UNIQUEMENT à titre de suggestion. Consulter les codes de votre région AVANT l'installation. OUTPUT WIEGAND - LiftMaster CAPAC | LiftMaster CAPAC Wiring Diagram - English French Spanish - Page 8
Accès à la porte NE PAS INSTALLER LE SYSTÈME EN MODE DE SÉCURITÉ INTÉGRÉE SAUF SI LES AUTORITÉS LOCALES AYANT JURIDICTION LE PERMETTENT. Cela pourrait causer une interférence avec le fonctionnement de la serrure antipanique. Non responsable des conflits entre l'information indiquée dans le schéma - LiftMaster CAPAC | LiftMaster CAPAC Wiring Diagram - English French Spanish - Page 9
Accès à la porte - vestibule NE PAS INSTALLER LE SYSTÈME EN MODE DE SÉCURITÉ INTÉGRÉE SAUF SI LES AUTORITÉS LOCALES AYANT JURIDICTION LE PERMETTENT. Cela pourrait causer une interférence avec le fonctionnement de la serrure antipanique. Non responsable des conflits entre l'information indiquée - LiftMaster CAPAC | LiftMaster CAPAC Wiring Diagram - English French Spanish - Page 10
. Cet équipement génère, utilise et peut émettre des fréquences radio et, s'il n'est pas installé et utilisé conformément aux instructions, peut causer un brouillage nuisible aux communications radio. Cependant, rien ne garantit l'absence de brouillage dans une installation particulière. Si cet - LiftMaster CAPAC | LiftMaster CAPAC Wiring Diagram - English French Spanish - Page 11
Para ver el manual de instalación completo visite: https://support.partner.liftmaster.com/s/ community-access-support CAPAC myQ® SMART ACCESS HUB ADVERTENCIA: Este producto puede exponerle a productos químicos (incluido el plomo), que a consideración del estado de California causan cáncer, defectos - LiftMaster CAPAC | LiftMaster CAPAC Wiring Diagram - English French Spanish - Page 12
(Fin de línea) (1 k ohm) OPERADOR DE PORTÓN (conectar al interruptor de límite de cierre auxiliar - consulte el manual del operador de portón) SALIR OPERADOR DE PORTÓN Consulte el manual del operador para ver los detalles de cableado. NOTA: Para instalaciones UL, solo un operador de portón listado - LiftMaster CAPAC | LiftMaster CAPAC Wiring Diagram - English French Spanish - Page 13
Acceso de puerta NO INSTALE EL SISTEMA EN EL MODO A PRUEBA DE FALLOS A MENOS QUE LA AUTORIDAD COMPETENTE LO PERMITA. De hacerlo, puede causar interferencia con el funcionamiento de la barra antipánico. No nos hacemos responsables por los conflictos entre la información detallada en el diagrama de - LiftMaster CAPAC | LiftMaster CAPAC Wiring Diagram - English French Spanish - Page 14
Acceso de la puerta - Vestíbulo NO INSTALE EL SISTEMA EN EL MODO A PRUEBA DE FALLOS A MENOS QUE LA AUTORIDAD COMPETENTE LO PERMITA. De hacerlo, puede causar interferencia con el funcionamiento de la barra antipánico. No nos hacemos responsables por los conflictos entre la información detallada en - LiftMaster CAPAC | LiftMaster CAPAC Wiring Diagram - English French Spanish - Page 15
Salida Wiegand NOTA: Desconecte la alimentación ANTES de realizar las conexiones eléctricas. El CAPAC enviará la credencial previamente asignada, configurada a través de myQ Community,al TES mediante la salida Wiegand. No nos hacemos responsables por los conflictos entre la información detallada en - LiftMaster CAPAC | LiftMaster CAPAC Wiring Diagram - English French Spanish - Page 16
114-5506-000B © 2021, LiftMaster All Rights Reserved Tous droits réservés Todos los derechos reservados LiftMaster 300 Windsor Drive Oak Brook, IL 60523 LiftMaster.com
-
 1
1 -
 2
2 -
 3
3 -
 4
4 -
 5
5 -
 6
6 -
 7
7 -
8
-
9
-
10
-
11
-
12
-
13
-
14
-
15
-
16
 |
 |
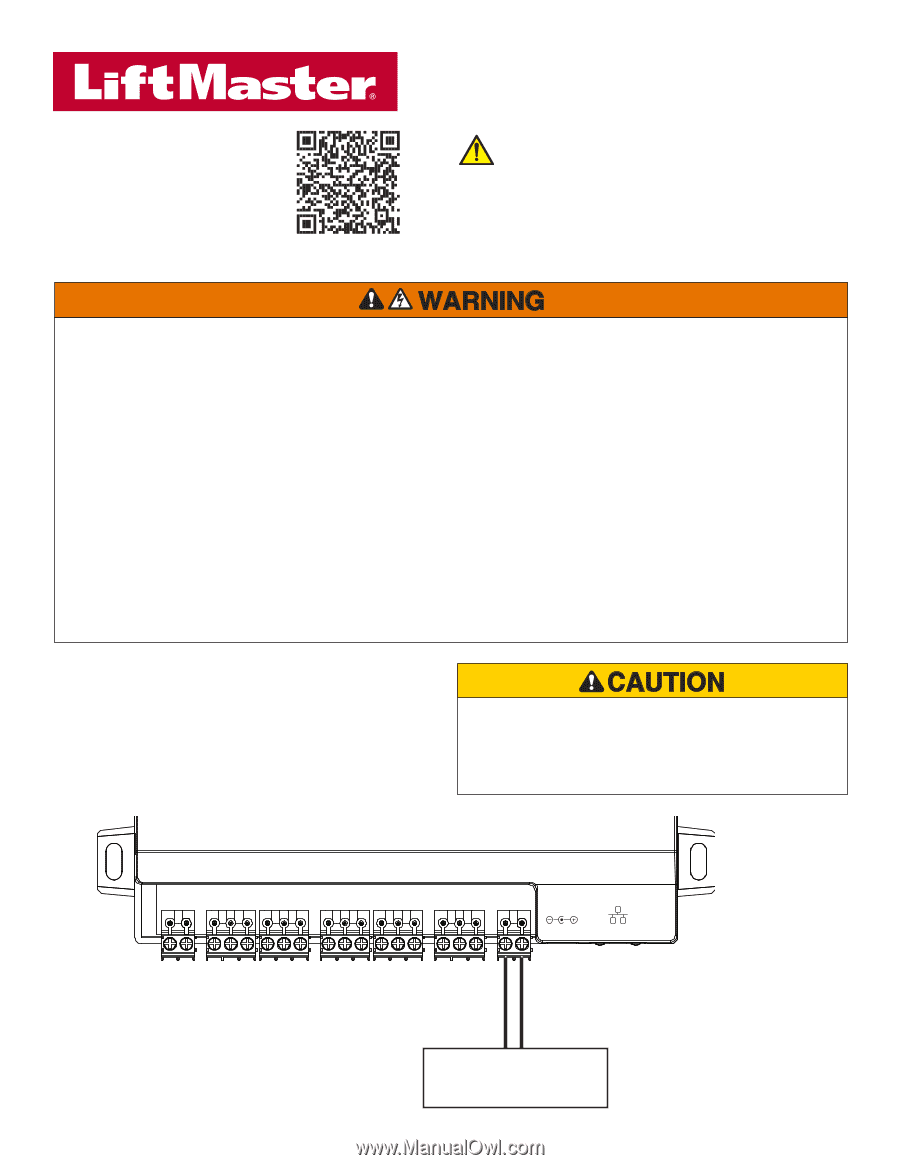
GATE
SDA SCL
OUTPUT
NO COM NC
NO COM NC
1
2
D1 COM D0
D1 COM D0
1
2
WIEGAND
1
GND
2
INPUT
GND 12V-24V
POWER
POWER
ETHERNET
CAPAC
myQ
®
SMART ACCESS HUB
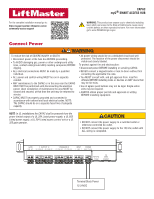
For the complete installation manual go to:
community-access-support
WARNING:
This product can expose you to chemicals including
lead, which are known to the State of California to cause cancer
or birth defects or other reproductive harm. For more information
go to www.P65Warnings.ca.gov.
Connect Power
•
DO NOT connect the power supply to a switched outlet or
otherwise controlled AC outlet.
•
DO NOT connect the power supply to the 120 Vac outlet until
ALL wiring is completed.
NOTE
: In UL installations the CAPAC shall be powered from the
power limited output of a UL 294 Listed power supply, a UL 603
Listed power supply, a UL 294 Listed access control unit or a UL
325 gate operator.
Terminal Block Power
12-24VDC
To reduce the risk of SEVERE INJURY or DEATH:
• Disconnect power at the fuse box BEFORE proceeding.
• To AVOID damaging gas, power or other underground utility
lines, contact underground utility locating companies BEFORE
digging.
• ALL electrical connections MUST be made by a qualified
individual.
• ALL power and control wiring MUST be run in separate
conduit.
• ANY maintenance to the CAPAC or in the area near the CAPAC
MUST NOT be performed until disconnecting the electrical
power. Upon completion of maintenance the area MUST be
cleared and secured, at that time the unit may be returned to
service.
• CAPAC MUST be properly grounded and connected in
accordance with national and local electrical codes. NOTE:
The CAPAC should be on a separate fused line of adequate
capacity.
• All power wiring should be on a dedicated circuit and well
protected. The location of the power disconnect should be
visible and clearly labeled.
To protect against fire and electrocution:
• Disconnect power BEFORE installing or servicing CAPAC.
• NEVER connect a keypad/reader or lock to doors without first
consulting the applicable fire code.
• You MUST consult with, and get approval from, local fire
officials BEFORE installing locks or devices on ANY doors that
may be fire exits.
• Use of egress push buttons may not be legal. Single action
exits may be required.
• ALWAYS obtain proper permits and approvals in writing
BEFORE installing equipment.