LiftMaster 8500W 8500W Users Guide - English French
LiftMaster 8500W Manual
 |
View all LiftMaster 8500W manuals
Add to My Manuals
Save this manual to your list of manuals |
LiftMaster 8500W manual content summary:
- LiftMaster 8500W | 8500W Users Guide - English French - Page 1
USER'S GUIDE FOR RESIDENTIAL USE ONLY INSTALL ON SECTIONAL DOORS WITH TORSION ASSEMBLIES ONLY Wall Mount Wi-Fi® Garage Door Opener Model 8500W This product is intended for installation only by trained garage door technicians. This product may require adjustments to door springs and/or track - LiftMaster 8500W | 8500W Users Guide - English French - Page 2
Guide 18-19 Repair Parts 20 Warranty 20 Safety Symbol and Signal Word Review This garage door opener has been designed and tested to offer safe service provided it is installed, operated, maintained and tested in strict accordance with the instructions and warnings contained in this manual - LiftMaster 8500W | 8500W Users Guide - English French - Page 3
connect garage door opener to power source until instructed to do so. 8. NEVER wear watches, rings or loose clothing while installing or servicing opener. They could be caught in garage door or opener mechanisms. 9. Install wall-mounted garage door control: • within sight of the garage door. • out - LiftMaster 8500W | 8500W Users Guide - English French - Page 4
to garage door opener BEFORE making ANY repairs or removing covers. 14. This operator system is equipped with an unattended operation feature. The door could move unexpectedly. NO ONE SHOULD CROSS THE PATH OF THE MOVING DOOR. 15. SAVE THESE INSTRUCTIONS. 4 For the complete manual visit LiftMaster - LiftMaster 8500W | 8500W Users Guide - English French - Page 5
make a permanent connection through the 7/8 inch hole in the back of the garage door opener (according to local code): 1. Be sure power is NOT connected to the opener, and disconnect power to circuit. 2. Remove the garage door opener from the torsion bar, remove cover screws and set the cover aside - LiftMaster 8500W | 8500W Users Guide - English French - Page 6
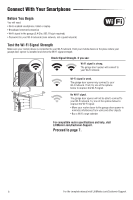
: • Move your router closer to the garage door opener to minimize interference from walls and other objects • Buy a Wi-Fi range extender For compatible router specifications and help, visit LiftMaster.com/Customer-Support. Proceed to page 7. 6 For the complete manual visit LiftMaster.com/Customer - LiftMaster 8500W | 8500W Users Guide - English French - Page 7
up an account and connect. For more information on connecting your garage door opener, visit Liftmaster.com/Customer-Support. Wi-Fi Status LED Blue Blue and Green Green Definition Off - Wi-Fi is not turned on. Blinking - Garage door opener is in Wi-Fi learn mode. Solid - Mobile device connected to - LiftMaster 8500W | 8500W Users Guide - English French - Page 8
garage door opener light flashes or two clicks are heard. To program other types of remote controls or keyless entries see the instructions included with the device or visit LiftMaster.com. Wireless Keypad Refer to the instructions 8 For the complete manual visit LiftMaster.com/Customer-Support - LiftMaster 8500W | 8500W Users Guide - English French - Page 9
the LEARN button on the garage door opener. OR On the Smart Control Panel, go to Menu > Program > myQ Device. 3. The code has been programmed when the not program with the Security+ 2.0 Garage door opener, install a repeater kit. Refer to HomeLink Instructions Below. HomeLink is the in-vehicle - LiftMaster 8500W | 8500W Users Guide - English French - Page 10
emergency release handle straight down a second time until a click noise is heard. The door will reconnect on the next UP or DOWN operation. Emergency Release Handle Disengage automatic garage door lock before opening door manually. 10 For the complete manual visit LiftMaster.com/Customer-Support - LiftMaster 8500W | 8500W Users Guide - English French - Page 11
to return to the main screen. Battery Backup The battery backup allows access in and out of your garage when the power is out. When the garage door opener is operating on battery power, the garage door opener will run slower and the lights, Timer-to-Close, and remote close features (myQ App) are - LiftMaster 8500W | 8500W Users Guide - English French - Page 12
beam is obstructed or misaligned while the door is closing, the door will reverse and the garage door opener lights will flash ten times. If the door is already open, it will not close. The sensors Sensor 6" (15 cm) max. above floor 12 For the complete manual visit LiftMaster.com/Customer-Support - LiftMaster 8500W | 8500W Users Guide - English French - Page 13
system. • After ANY adjustments are made, the safety reversal system MUST be tested. Door MUST reverse on contact with 1-1/2" (3.8 cm) high object (or 2x4 laid flat) on floor. Your garage door opener is designed with electronic controls to make setup and adjustments easy. The adjustments allow you - LiftMaster 8500W | 8500W Users Guide - English French - Page 14
garage door opener door through a complete up and down cycle using the remote control or the UP and DOWN buttons. Programming is complete. If you are unable to operate the door up and down, repeat the steps for Programming the Travel. 14 For the complete manual visit LiftMaster.com/Customer-Support - LiftMaster 8500W | 8500W Users Guide - English French - Page 15
inch (2.5 cm), and the garage door opener lights will flash 10 times. 2.2 Press the remote control push button to close the door. The door MUST reverse when it makes contact with the board. If the door stops but does not reverse: 1. Review the installation instructions provided to insure all steps - LiftMaster 8500W | 8500W Users Guide - English French - Page 16
Open and close the door using the remote control or door control. 3. In battery backup mode, the Automatic Garage Door Lock will unlock when the garage door is opened, and will remain disabled until power is restored. 4. Plug in the garage door opener manual visit LiftMaster.com/Customer-Support - LiftMaster 8500W | 8500W Users Guide - English French - Page 17
springs may be broken. See above. • If the problem occurs on the first operation of the garage door opener, door may be locked. Disable the power door lock. The garage door opener won't operate due to power failure: • Manually open the power door lock. • Use the emergency release handle to disconnect - LiftMaster 8500W | 8500W Users Guide - English French - Page 18
Please review the safety and maintenance tips in this guide carefully and keep it for reference. Check the operation of your garage door and opener to ensure they function in a safe and trouble-free manner. Be sure to read all Important Safety Information found in your garage door opener's manual as - LiftMaster 8500W | 8500W Users Guide - English French - Page 19
Can Prevent Tragedies Make monthly inspection and testing of your garage door and opener system a part of your regular routine. Review your owner's manual for both the door and door opener. If you don't have the owner's manuals, contact the manufacturer(s) and request a copy for your specific model - LiftMaster 8500W | 8500W Users Guide - English French - Page 20
Parts To see repair parts for your garage door opener, identify the model number on the end panel of the opener and visit LiftMaster.com/Customer-Support to download or print the installation manual. Warranty LIFTMASTER® LIMITED WARRANTY LiftMaster ("Seller") warrants to the first retail purchaser - LiftMaster 8500W | 8500W Users Guide - English French - Page 21
GUIDE DE L'UTILISATEUR POUR RÉSIDENCES SEULEMENT INSTALLER EN LES PORTES DE SECTIONNELLE AVEC ENSEMBLES DE TORSION SEULEMENT Ouvre-porte de garage Wi-Fi® à montage mural Modèle 8500W Ce produit est prévu pour être installé uniquement par des techniciens formés en installation de portes de garage. - LiftMaster 8500W | 8500W Users Guide - English French - Page 22
16-17 Guide de sécurité et d'entretien de l'ouvre-porte de garage automatique 18- garage a été conçu et mis à l'essai dans le but d'offrir un service sûr à condition qu'il soit installé, utilisé, entretenu et mis à l'essai en stricte conformité avec les instructions LiftMaster.com/Customer-Support - LiftMaster 8500W | 8500W Users Guide - English French - Page 23
L'INSTALLATION Pour réduire le risque de BLESSURES GRAVES, ou MORT: 1. LIRE ET SUIVRE TOUS LES AVERTISSEMENTS ET INSTRUCTIONS. 2. Poser l'ouvre-porte de garage UNIQUEMENT sur une porte de garage bien équilibrée et lubrifiée. Une porte mal équilibrée peut ne PAS inverser sa course en cas de besoin - LiftMaster 8500W | 8500W Users Guide - English French - Page 24
obstrue la trajectoire de la porte. 8. Ne JAMAIS utiliser la poignée pour ouvrir ou fermer la porte de garage. Il y a risque de chute si le nœud de la corde se défait. 9. Après avoir EN MOUVEMENT. 15. CONSERVER CES INSTRUCTIONS. 4 Pour le manuel complet, visitez LiftMaster.com/Customer-Support - LiftMaster 8500W | 8500W Users Guide - English French - Page 25
du circuit AVANT de retirer le couvercle pour procéder à un branchement permanent. • L'installation et le câblage de la porte de garage DOIVENT être conformes à TOUS les codes électriques et du bâtiment locaux. • Ne JAMAIS utiliser un cordon prolongateur ou un adaptateur bifilaire ni modifier la fiche - LiftMaster 8500W | 8500W Users Guide - English French - Page 26
ci-dessous pour améliorer le signal Wi-Fi. Aucun signal Wi-Fi. L'ouvre-porte de garage ne pourra pas se connecter à votre réseau WiFi. Essayer l'une des options cidessous pour améliorer de l'aide, aller à LiftMaster.com/Customer-Support. Passez à la page 7. 6 Pour le manuel complet, visitez - LiftMaster 8500W | 8500W Users Guide - English French - Page 27
chargez l'application myQ. 2. Créer un compte vous connecter. Pour plus d'information sur la façon de connecter votre ouvre-porte de garage, allez à liftmaster.com/customer-support. État du Wi-Fi DEL Bleu Bleue et verte Verte Définition Arrêt - Le Wi-Fi n'est pas activé. Clignotant - Mettre l'ouvre - LiftMaster 8500W | 8500W Users Guide - English French - Page 28
-porte de garage clignote ou que deux clics se fassent entendre. Pour programmer d'autres types de télécommandes ou d'émetteurs à code, voir les instructions fournies avec l'appareil ou aller à LiftMaster.com. 1 Clavier sans fil Consulter les instructions fournies avec l'émetteur à code OU aller - LiftMaster 8500W | 8500W Users Guide - English French - Page 29
> Program > myQ Device (Menu > Programme > Dispositif myQ). 3. Le code a été programmé lorsque la lampe télécommandée clignote une fois. REMARQUE : être programme avec l'ouvre-porte de garage Security+ 2.0, installer un répéteur. Se reporter aux instructions HomeLink ci-dessous. HomeLink est le syst - LiftMaster 8500W | 8500W Users Guide - English French - Page 30
garage se fasse entendre. La porte de réengagera lors du prochain cycle d'ouverture ou de fermeture. Poignée de déclenchement d'urgence Désengager la serrure automatique de la porte de garage avant d'ouvrir la porte manuellement 10 Pour le manuel complet, visitez LiftMaster.com/Customer-Support - LiftMaster 8500W | 8500W Users Guide - English French - Page 31
jusqu'à 24 heures. Pour obtenir une longévité maximale de la pile et éviter tous dommages, débranchez la pile si l'ouvre-porte de garage reste débranché pendant une longue période de temps. Statut de batterie DEL • DEL verte allumée en continu - Pile chargée • DEL verte allumée clignotante - LiftMaster 8500W | 8500W Users Guide - English French - Page 32
quand la porte se ferme, celle-ci va revenir en arrière et les lumières de l'ouvre-porte de garage vont clignoter dix fois. Si la porte est déjà ouverte, elle ne se fermera pas. On peut aligner les cm (6 po) max au-dessus du sol 12 Pour le manuel complet, visitez LiftMaster.com/Customer-Support - LiftMaster 8500W | 8500W Users Guide - English French - Page 33
DOIT remonter au contact d'un objet d'une hauteur de 3,8 cm (1-1/2 de po) (ou un 2 x 4 posé à plat) du sol. Votre ouvre-porte de garage a été conçu avec des commandes électroniques pour simplifier la configuration et les réglages. Les réglages vous permettent de programmer là où la porte s'arrêtera - LiftMaster 8500W | 8500W Users Guide - English French - Page 34
désirée, appuyer sur le bouton de réglage et le relâcher. L'éclairage de l'ouvre-porte de garage clignotera deux fois et le bouton DOWN commencera à clignoter. 1.4 Appuyer sur le bouton DOWN et le maintenir de la course. 14 Pour le manuel complet, visitez LiftMaster.com/Customer-Support - LiftMaster 8500W | 8500W Users Guide - English French - Page 35
porte ne se déplacera pas plus de 2,5 cm (1 po) et l'éclairage de l'ouvre-porte de garage clignotera 10 fois. Si la porte arrête sa course, mais ne l'inverse pas : 1. Revoir les instructions d'installation fournies pour vérifier que toutes les étapes ont bien été suivies; 2. Répéter la programmation - LiftMaster 8500W | 8500W Users Guide - English French - Page 36
cessaire de lubrifier davantage l'ouvre-porte de garage. Ne pas graisser les guides de la porte. • Mettre la pile à l'essai et songer à il n'est pas installé et utilisé conformément aux instructions, peut causer des interférences nuisibles aux communications radio. LiftMaster.com/Customer-Support - LiftMaster 8500W | 8500W Users Guide - English French - Page 37
toujours pas la porte, vérifier les codes d'anomalie pour s'assurer que l'ouvre-porte de garage fonctionne correctement. La télécommande possède une sur l'arbre de renvoi. Si ce n'est pas le cas, déplacer le support de fixation. La porte de garage émet un bip et la DEL rouge clignote : La charge de la - LiftMaster 8500W | 8500W Users Guide - English French - Page 38
guide et conserver celle-ci pour référence ultérieure. Vérifiez votre porte de garage et guide. Les ouvre-portes de garage ne sont pas des jouets Discutez de la sécurité de la porte de garage bouton là où vous pouvez clairement voir la porte de garage qui se ferme. Gardez la porte bien en vue jusqu - LiftMaster 8500W | 8500W Users Guide - English French - Page 39
de porte pour obtenir une assistance. • Vérifiez que les cellules photoélectriques ne dépassent pas une hauteur de 15 cm (6 po) du plancher du garage. Testez le bon fonctionnement de la porte : • Ouvrez et fermez la porte manuellement en utilisant les poignées ou des points de préhension convenables - LiftMaster 8500W | 8500W Users Guide - English French - Page 40
garage, identifier le numéro de modèle sur le panneau d'extrémité de l'ouvre-porte et visiter LifMaster.com/Customer-Support pour télécharger ou imprimer le manuel d'installation. Garantie LIFTMASTER® GARANTIE LIMITÉE LiftMaster désassembler ce produit. Des instructions de démontage et d'expédition
-
 1
1 -
 2
2 -
 3
3 -
 4
4 -
 5
5 -
 6
6 -
 7
7 -
8
-
9
-
10
-
11
-
12
-
13
-
14
-
15
-
16
-
17
-
18
-
19
-
20
-
21
-
22
-
23
-
24
-
25
-
26
-
27
-
28
-
29
-
30
-
31
-
32
-
33
-
34
-
35
-
36
-
37
-
38
-
39
-
40
 |
 |

USER’S GUIDE
•
Please read this manual and the enclosed safety materials carefully!
•
The door WILL NOT CLOSE unless the Protector System
®
and cable tension
monitor are connected and properly aligned.
•
Periodic checks of the garage door opener are required to ensure safe
operation.
•
The model number is located on the front cover of the operator.
•
This garage door opener is ONLY compatible with myQ
®
and Security+ 2.0
®
accessories.
This product is intended for installation only by trained garage door technicians. This
product may require adjustments to door springs and/or track configurations. This product
is not intended for use on low headroom tracks with outside pickup drum or garage doors
utilizing extension springs.
FOR RESIDENTIAL USE ONLY
INSTALL ON SECTIONAL DOORS WITH
TORSION ASSEMBLIES ONLY
LiftMaster.com
Register your garage door opener to receive updates and offers from LiftMaster
OR register online at: www.prodregister.com/LiftMaster
Take a photo
of the camera icon
including the points (
).
Wall Mount Wi-Fi
®
Garage Door Opener
Model 8500W
SM
Send it in
by texting the photo
to 71403 (US)
or visit
www.liftmaster.photo (Global)
LiftMaster
300 Windsor Drive
Oak Brook, IL 60523