Kenwood TH-D72 User Manual 1 - Page 36
Gps - 6, Mark Way Point
 |
View all Kenwood TH-D72 manuals
Add to My Manuals
Save this manual to your list of manuals |
Page 36 highlights
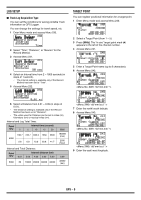
MARK WAY POINT You can register up to 100 points with the location's latitude, longitude, altitude, time, name, and icon. Names and icons can be manually edited. 1 When the frequency or position is displayed, press [MARK] (1s) to enter Mark Waypoint registration mode. • When registering a Mark Waypoint, the following display appears for approximately 10 seconds. ■ Copying the Mark Way Point to the Target Point You can copy the displayed Mark Way Point to the Target Point. 1 Select "Copy to TP" to display the Target Point list. 2 Select the Target Point (1 ~ 5) that you want to copy. 2 Press [ OK] to enter Mark Waypoint editing Mode. 3 Selecting "Name" will enter the Name editing screen. You can enter up to 9 characters. ■ Mark Way Point List The information registered with the Mark Waypoint is confirmed. Press [MARK] to display the Mark Waypoint list. • The list of Mark way point appears. 4 Selecting "Icon" will enter the Icon selection screen. Refer to the APRS explanation regarding the available icons. Note: ◆ Even when the Log function is OFF, you can register a Mark Waypoint. ◆ The MCP-4A can read Mark Way points. • When there is no data registered in the Mark Waypoint, "No Mark" is displayed. • Rotate the Tuning control: Selects the station data. • Press [ ]: To move the cursor " " up the display, to the previous list number. • Press [ ]: To move the cursor " " down the display, to the next list number. • Press [ OK]: Displays the details of the selected Mark Waypoint. • Press [A/B]: Deletes the selected Mark Waypoint. • "Clear?" appears then press [ OK] to clear. • Press [A/B] (1s): Deletes all Mark Waypoints. • "Clear All?" appears. Press [ OK], "Sure?" appears then press [ OK] to clear all. • Press [MENU]: Enters Mark Waypoint Edit mode. • Press [MARK] or [ESC ]: Returns to the frequency display. Note: When the Mark way point is no data registered, "No Mark" is displayed. GPS - 6
-
 1
1 -
2
-
3
-
4
-
5
-
6
-
7
-
8
-
9
-
10
-
11
-
12
-
13
-
14
-
15
-
16
-
17
-
18
-
19
-
20
-
21
-
22
-
23
-
24
-
25
-
26
-
27
-
28
-
29
-
30
-
 31
31 -
 32
32 -
 33
33 -
 34
34 -
 35
35 -
 36
36 -
 37
37 -
 38
38 -
 39
39 -
 40
40 -
 41
41 -
42
-
43
-
44
-
45
-
46
-
47
-
48
-
49
-
50
-
51
-
52
-
53
-
54
-
55
-
56
-
57
-
58
-
59
-
60
-
61
-
62
-
63
-
64
-
65
-
66
-
67
-
68
-
69
-
70
-
71
-
72
-
73
-
74
-
75
 |
 |
