Kenwood CT-405 User Manual - Page 10
Preparation for playback (recording), Playback (recording) preparation
 |
View all Kenwood CT-405 manuals
Add to My Manuals
Save this manual to your list of manuals |
Page 10 highlights
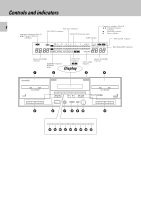
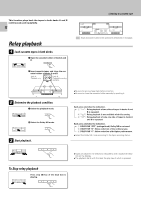
Preparation for playback (recording) 3 7 2 Before playback (recording) 10 TAPE A AUTO REVERSE 2 7 3 - ON - OFF 1 Set the TIMER switch to OFF. AUTO REVERSE TAPE B TIMER PLAY REC OFF PLAY 2 7 3 TAPE A AUTO REVERSE 2 7 3 - ON - OFF 2 Set the POWER switch to ON. POWER - ON - OFF AUTO REVERSE TAPE B 0 0 TAPE A AUTO REVERSE 2 7 3 - ON - OFF AUTO REVERSE TAPE B 2 7 3 : Keys and control used in the operations described on this page. Playback (recording) preparation 1 Load a cassette tape in deck A or B. 1 Press the eject (0) key. TAPE A AUTO REVERSE 2 7 3 - ON - OFF 3 AUTO REVERSE TAPE B 0 2 7 2 Insert a tape and close the cassette holder. Deck A: Playback only. Deck B: Playback/recording available. ÷ Be sure to remove tape slack before insertion. ÷ The type of tape, that is, the Normal, High position or Metal position (playback only) is selected automatically. ÷ This unit cannot record sound on a Metal tape. ÷ Be sure to close the cassette holder securely by pushing it. Normal position High position Metal position (playback only) TYPE TYPE TYPE A B 2 Select the tape transport direction. TAPE A AUTO REVERSE 2 7 3 - ON - OFF 3 1 Press the play (2 or 3) key. AUTO REVERSE TAPE B 2 7 3 2 7 To play (record) tape side B. To play (record) tape side A. TAPE A AUTO REVERSE 2 7 3 - ON - OFF Feed the tape section which cannot be played or recorded onto in the forward direction. 2 Press the stop (7) key. AUTO REVERSE TAPE B 2 7 3 Tape transport direction indicators The 2 and 3 indicators show the direction the tape is transported during recording or playback. The direction used when the tape is last stopped is held in memory even after this unit has been turned OFF, and the tape transport starts in the indicated direction when the unit is started automatically by a timer, etc. To change the tape transport direction, press the play key for the opposite direction and immediately press the stop (7) key. Deck A direction indicators. Deck B direction indicators. 2 7 3 3 7 2 3 Determine the playback (recording) condition. 1 Select the playback (recording) mode. TAPE A AUTO REVERSE 2 7 3 - ON - OFF AUTO REVERSE TAPE B REV.MODE 2 7 3 2 Select the Dolby NR mode. TAPE A AUTO REVERSE 2 7 3 - ON - OFF AUTO REVERSE TAPE B DOLBY NR Each press switches the indication. 1 "[" : Double-side playback (recording) which stops tape stops after having played (or recorded) both sides. 2 """ : Playback is endless, but recording stops after having recorded both sides. 3 """ : One-way playback (recording) which stops tape after having played (or recorded) a single side. Each press switches the indication. 1 DOLBY NR "OFF" (extinguished): Dolby NR is not used. 2 DOLBY NR "B": Noise reduction of the ordinary type. 3 DOLBY NR "C": Noise reduction with higher performance. ÷ Select the Dolby NR mode according to the tape recording status.
-
 1
1 -
2
-
3
-
4
-
 5
5 -
 6
6 -
 7
7 -
 8
8 -
 9
9 -
 10
10 -
 11
11 -
 12
12 -
 13
13 -
 14
14 -
 15
15 -
16
-
17
-
18
-
19
-
20
-
21
-
22
-
23
-
24
-
25
-
26
-
27
-
28
 |
 |
