Invacare ORBITL Owners Manual - Page 52
Seat And Back
 |
View all Invacare ORBITL manuals
Add to My Manuals
Save this manual to your list of manuals |
Page 52 highlights
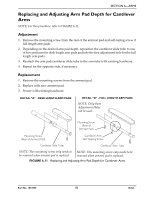
SECTION 7-SEAT AND BACK SECTION 7-SEAT AND BACK ƽ WARNING After any adjustments, repair or service and before use, make sure all attaching hardware is tightened securely. Otherwise injury or damage may occur. NOTE: The procedures in this section of the manual apply to non‐recliner seat frames only except where noted. Replacing the Locking Mechanism in the Back Cane CAUTION The locking mechanism in the back canes is spring loaded. Slowly remove the back canes from the wheelchair to prevent the springs from being lost. NOTE: For this procedure, refer to FIGURE 7.1. 1. Fold the back canes down and out of the way. Refer to Folding/Unfolding the Back Canes on page 56. 2. Twist the actuator counterclockwise to remove from the locking mechanism. 3. Slowly let the locking mechanism and spring slide out of the back cane. NOTE: Inspect the spring for wear and damage. Replace if necessary. 4. Slide the new locking mechanism and spring into the back cane. 5. Make sure the angled end of the locking mechanism is pointing up towards the locking pin on the adjustment plate. 6. Use Loctite™ 242, on threads only, and securely tighten the actuator into the locking mechanism. 7. Unfold the back canes. Refer to Folding/Unfolding the Back Canes on page 56. Spring Locking Mechanism Back Cane Actuator Angled Portion of Locking Mechanism FIGURE 7.1 Replacing the Locking Mechanism in the Back Cane Orbit™ 52 Part No. 1073955
-
 1
1 -
2
-
3
-
4
-
5
-
6
-
7
-
8
-
9
-
10
-
11
-
12
-
13
-
14
-
15
-
16
-
17
-
18
-
19
-
20
-
21
-
22
-
23
-
24
-
25
-
26
-
27
-
28
-
29
-
30
-
31
-
32
-
33
-
34
-
35
-
36
-
37
-
38
-
39
-
40
-
41
-
42
-
43
-
44
-
45
-
46
-
 47
47 -
 48
48 -
 49
49 -
 50
50 -
 51
51 -
 52
52 -
 53
53 -
 54
54 -
 55
55 -
 56
56 -
 57
57 -
58
-
59
-
60
-
61
-
62
-
63
-
64
-
65
-
66
-
67
-
68
-
69
-
70
-
71
-
72
-
73
-
74
-
75
-
76
-
77
-
78
-
79
-
80
-
81
-
82
-
83
-
84
 |
 |
