Icom IC-705 Instructions 3 - Page 4
Operation
 |
View all Icom IC-705 manuals
Add to My Manuals
Save this manual to your list of manuals |
Page 4 highlights
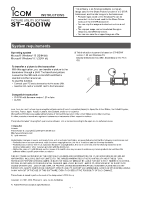
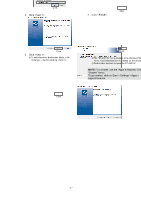
Operation Cropping a picture 1. Click to . •• The Select Picture screen is displayed. LLYou can also select the picture by dragging and dropping it from a folder. 2. Select where the picture you want to edit is stored. 3. Set the frame around the portion that will be cropped by dragging the anchors on the corners. •• The edited picture is displayed on the right side. Adding a text to the picture 1. Enter a text. 2. Click . 3. Set the text font, size, color, and so on. LLSee page 3 for the details. Saving the picture on the PC 1. Click . •• The Save as window is displayed. 2. Select the destination to save the picture. LLIf you change the file name, enter one of up to 23 characters. Transferring the picture to the transceiver 1. Click "Transfer Settings" in the Settings menu. 2. Enter the transceiver's IP address or Network Name. LLSee the transceiver's manual about how to check its IP address. 3. Click . 4. Click . 5. Operate the transceiver following the displayed dialog. LLTo cancel transfer, click . TIP: About IP address An IP address is a numerical label that is assigned to devices participating in a LAN. When the transceiver's DHCP setting is set to ON, the DHCP server assigns a dynamic IP address to your transceiver. Therefore, entering Network Name is recommended because the PC's OS has to match the IP address each time you transfer a picture to the transceiver. NOTE: If you cannot transfer the picture, check the following: On the transceiver •• The transceiver is turned ON. LLYou cannot transfer the picture if the transceiver is in the Standby mode. •• The transceiver and PC are connected to the same LAN. •• The transceiver's firmware is the latest. •• An SD card or microSD card is inserted into the transceiver. •• The transceiver is in a normal operating mode. LLThe transceiver cannot receive the picture in special modes, such as the firmware update mode, clone mode, setting save mode, import or export mode, or touch screen calibration mode. •• Operate the transceiver following to a displayed dialog. On the PC •• The transceiver's correct IP address or Network Name is entered in Transfer Settings. - 4 - 1-1-32 Kamiminami, Hirano-ku, Osaka 547-0003, Japan May 2020 A7550-1EX-1 © 2019-2020 Icom Inc.
-
 1
1 -
 2
2 -
 3
3 -
 4
4
 |
 |
