Hitachi X4020 User Manual - Page 55
Cleaning and replacing the air
 |
UPC - 050585151727
View all Hitachi X4020 manuals
Add to My Manuals
Save this manual to your list of manuals |
Page 55 highlights
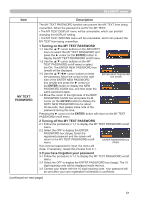
Maintenance Cleaning and replacing the air filter The air filter has two kinds of filters inside. Please check and clean the air filter periodically. When the indicators or a message prompts you to clean the air filter, comply with it as soon as possible. If the filters are damaged or heavily soiled, replace them with the new ones. To prepare the new filters, make contact with your dealer and tell the following type number. Type number : MU06641 (Filter unit) When you replace the lamp, please replace the air filter. An air filter of specified type will come together with a replacement lamp for this projector. 1. Turn the projector off, and unplug the power cord. Allow the projector to sufficiently cool down. 2. 2. Use a vacuum cleaner on and around the filter cover. 3. Filter cover 3. Pick and pull up the filter cover knobs to take it off. Filter cover knobs 4. Press up slightly the bottom side knobs to unlock the 4. bottom side of the filter unit. Pull the center knob to take the filter unit off. 5. Use a vacuum cleaner for the filter vent of the Filter unit knobs Filter unit 6. projector and the outer side of the filter unit. The filter unit consists of two parts. Press down 5. around the interlocking parts to unlock, then separate 6. Interlock parts the two parts. 7. Use a vacuum cleaner for the inner side of each part of the filter unit to clean them up. If the filters are damaged or heavily soiled, replace them with the new ones. 8. Combine the two parts to reassemble the filter unit. 9. Put the filter unit back into the projector. 7. 10.Put the filter cover back into the place. 11.Turn the projector on and reset the filter time using the FILTER TIME item in the EASY MENU. (1) Press the MENU button to display a menu. (2) Point at the FILTER TIME using the ▲/▼ cursor buttons, then press the ► cursor (or the ENTER / the RESET) button. A dialog will appear. (3) Press the ► cursor button to select the "OK" on the dialog. It performs resetting the filter time. WARNING ►Before taking care of the air filter, make sure the power cable is not plugged in, then allow the projector to cool sufficiently. ►Use only the air filter of the specified type. Do not use the projector without the air filter or the filter cover. It could result in a fire or malfunction to the projector. ►Clean the air filter periodically. If the air filter becomes clogged by dust or the like, internal temperatures rise and could cause a fire, a burn or malfunction to the projector. NOTE • Please reset the filter time only when you have cleaned or replaced the air filter, for a suitable indication about the air filter. • The projector may display the message such as the "CHECK THE AIR FLOW" or turn off the projector, to prevent the internal heat level rising. 55
-
 1
1 -
2
-
3
-
4
-
5
-
6
-
7
-
8
-
9
-
10
-
11
-
12
-
13
-
14
-
15
-
16
-
17
-
18
-
19
-
20
-
21
-
22
-
23
-
24
-
25
-
26
-
27
-
28
-
29
-
30
-
31
-
32
-
33
-
34
-
35
-
36
-
37
-
38
-
39
-
40
-
41
-
42
-
43
-
44
-
45
-
46
-
47
-
48
-
49
-
 50
50 -
 51
51 -
 52
52 -
 53
53 -
 54
54 -
 55
55 -
 56
56 -
 57
57 -
 58
58 -
 59
59 -
 60
60 -
61
-
62
-
63
-
64
-
65
 |
 |
