Hitachi CP-X4021N Instant Stack Guide - Page 8
Installation of the first projector Set
 |
View all Hitachi CP-X4021N manuals
Add to My Manuals
Save this manual to your list of manuals |
Page 8 highlights
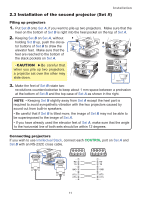
2.2 Installation of the first projector (Set A) Removing pocket caps When you pile up two projectors, remove pocket caps on Set A. CAUTION ►It is recommended to use a pin or something similar to remove the caps. If you use your finger, be careful not to injure your nail and finger. Installation Pocket caps NOTE • Cap storage pockets for the pocket caps are provided inside of the lens adjuster door. Be sure to keep the caps in the storage pockets, when taking the caps from the stack pockets. To store the cap to the pocket, put thin side of the cap to the pocket first, and then firmly push down the other side of the cap to the bottom end of the pocket. Be aware that keeping the caps solidly is extremely important to prevent children and pets from swallowing the caps. Thin side LOCK Cap storage pocket Preparing of elevator feet When you pile up two projectors, set the elevator feet length minimum with using the elevator buttons on Set A and B. CAUTION ►Be careful that when you pile up two projectors, a projector set over the other may slide down. Deciding installation position Decide the position of Set A and its projection angle. (User's Manual (concise) → Arrangement and Adjusting the projector's elevator.) NOTE • The angle of gradient of Set A to the horizontal line should be within 12 degrees. • Keep in mind the followings when you consider the installation position. - VERTICAL adjuster should be set to upper limit position. - ZOOM ring should not be set to fully wide position. - HORIZONTAL adjuster is recommended to be set around center position. 8
-
 1
1 -
2
-
 3
3 -
 4
4 -
 5
5 -
 6
6 -
 7
7 -
 8
8 -
 9
9 -
 10
10 -
 11
11 -
 12
12 -
 13
13 -
14
-
15
-
16
-
17
-
18
-
19
-
20
-
21
-
22
-
23
-
24
-
25
-
26
-
27
-
28
-
29
-
30
-
31
-
32
-
33
-
34
-
35
-
36
-
37
 |
 |
