HP Z3100ps HP Designjet Z3100 Printing Guide [HP Advanced Profiling Solution] - Page 4
Step 3, White Point, Gamma and Luminance, Calibrate, Profiling Summary - specifications
 |
UPC - 808736859547
View all HP Z3100ps manuals
Add to My Manuals
Save this manual to your list of manuals |
Page 4 highlights
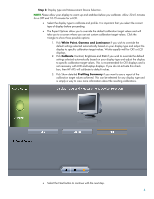
Step 3: Display type and Measurement Device Selection. NOTE Please allow your display to warm up and stabilize before you calibrate. Allow 30-45 minutes for a CRT and 10-15 minutes for a LCD. • Select the display type to calibrate and profile. It is important that you select the correct type of display before proceeding. • The Expert Options allow you to override the default calibration target values and will take you to a screen where you can set custom calibration target values. Click the triangle to show three possible options: 1. Pick White Point, Gamma and Luminance if you wish to override the default settings selected automatically based on your display type and adjust the display to specific calibration target values. Works equally well for CRT or LCD displays. 2. Pick Calibrate Contrast, Brightness and RGB if you wish to override the default settings selected automatically based on your display type and adjust the display to specific calibration target values. This is recommended for CRT displays and is not necessary with LCD and Laptop displays. If you do not activate this check box, then HP APS will calibrate to default values. 3. Pick Show detailed Profiling Summary if you want to see a report of the calibration target values achieved. This can be selected for any display type and is simply a way to view more information about the resulting calibrations. • Select the Next button to continue with the next step. 4
-
 1
1 -
 2
2 -
 3
3 -
 4
4 -
 5
5 -
 6
6 -
 7
7 -
 8
8 -
 9
9 -
 10
10
 |
 |
