HP XM600 hp kayak xm600, installing and replacing hardware parts in your pc wo - Page 8
Removing and Replacing the Memory Expansion Card, Removing the, Memory Expansion
 |
View all HP XM600 manuals
Add to My Manuals
Save this manual to your list of manuals |
Page 8 highlights
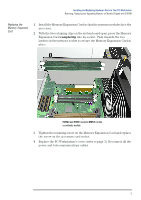
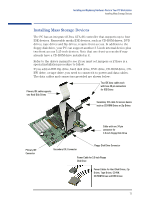
Installing and Replacing Hardware Parts in Your PC Workstation Removing, Replacing and Upgrading Memory on Models Shipped with SDRAM 5 To install a module, ensure that the two notches of the memory module are aligned with those of the socket. With the two retaining clips open, press the memory module completely into the socket. You hear two clicks as the retaining clips click into position. š ™ š ™ 6 Replace the HP UltraFlow Airflow Guide (refer to page 4 for instructions). 7 Replace the PC Workstation's cover (refer to page 3). Reconnect all the power and telecommunications cables. 8 Check the HP Summary Screen to verify the new configuration (refer to "Viewing the HP Summary Screen" in the Section on "Setting Up and Using Your PC Workstation") Removing and Replacing the Memory Expansion Card NOTE The unused memory sockets on the system board, RIMM0 and RIMM1 must contain a continuity module. Removing the Memory Expansion Card 1 Switch off the display and PC Workstation. Disconnect all power cables and any LAN or telecommunications cables. 2 Remove the PC Workstation's cover (refer to page 2 for instructions). 3 Release the retaining screw located on the Memory Expansion Card. Then remove the screw from accessory card socket. 4 Open the two retaining clips on the system board to release the Memory Expansion Card, then remove it from the connector. 5 Remove memory modules from the old Memory Expansion Card, then install them on the new Memory Expansion Card. 8
-
 1
1 -
2
-
 3
3 -
 4
4 -
 5
5 -
 6
6 -
 7
7 -
 8
8 -
 9
9 -
 10
10 -
 11
11 -
 12
12 -
 13
13 -
14
-
15
-
16
-
17
-
18
-
19
-
20
-
21
-
22
-
23
-
24
-
25
-
26
-
27
-
28
-
29
-
30
-
31
 |
 |
