HP ProDesk 498 G3 Micro Maintenance and Service Guide - Page 70
the front of the computer
 |
View all HP ProDesk 498 G3 Micro manuals
Add to My Manuals
Save this manual to your list of manuals |
Page 70 highlights
Power supply connectors connect to the drives as follows: ● P3 connector: primary hard drive ● P5 connector: primary optical drive ● P4 connector: secondary SATA drive 5. From the inside of the chassis, press the power supply release button (1), slide the power supply toward the front of the computer, rotate slightly into the computer so the power supply clears the lip on the top of the chassis, and then lift the power supply out of the chassis (2). To install the power supply, reverse the removal procedure. 62 Chapter 4 Removal and replacement procedures: Microtower
-
 1
1 -
2
-
3
-
4
-
5
-
6
-
7
-
8
-
9
-
10
-
11
-
12
-
13
-
14
-
15
-
16
-
17
-
18
-
19
-
20
-
21
-
22
-
23
-
24
-
25
-
26
-
27
-
28
-
29
-
30
-
31
-
32
-
33
-
34
-
35
-
36
-
37
-
38
-
39
-
40
-
41
-
42
-
43
-
44
-
45
-
46
-
47
-
48
-
49
-
50
-
51
-
52
-
53
-
54
-
55
-
56
-
57
-
58
-
59
-
60
-
61
-
62
-
63
-
64
-
 65
65 -
 66
66 -
 67
67 -
 68
68 -
 69
69 -
 70
70 -
 71
71 -
 72
72 -
 73
73 -
 74
74 -
 75
75 -
76
-
77
-
78
-
79
-
80
-
81
-
82
-
83
-
84
-
85
-
86
-
87
-
88
-
89
-
90
-
91
-
92
-
93
-
94
-
95
-
96
-
97
-
98
-
99
-
100
-
101
-
102
-
103
-
104
-
105
-
106
-
107
-
108
-
109
-
110
-
111
-
112
-
113
-
114
-
115
-
116
-
117
-
118
-
119
-
120
-
121
-
122
-
123
-
124
-
125
-
126
-
127
-
128
-
129
-
130
-
131
-
132
-
133
-
134
-
135
-
136
-
137
-
138
-
139
-
140
-
141
-
142
-
143
-
144
-
145
-
146
-
147
-
148
 |
 |

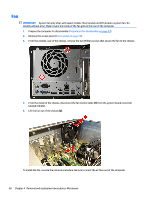
Power supply connectors connect to the drives as follows:
●
P3 connector: primary hard drive
●
P5 connector: primary optical drive
●
P4 connector: secondary SATA drive
5.
From the inside of the chassis, press the power supply release button
(1)
, slide the power supply toward
the front of the computer, rotate slightly into the computer so the power supply clears the lip on the top
of the chassis, and then lift the power supply out of the chassis
(2)
.
To install the power supply, reverse the removal procedure.
62
Chapter 4
Removal and replacement procedures: Microtower