HP C4345 Basics Guide - Page 18
Case G: Fax line shared with computer dial-up modem (no voice calls received)
 |
UPC - 883585470938
View all HP C4345 manuals
Add to My Manuals
Save this manual to your list of manuals |
Page 18 highlights
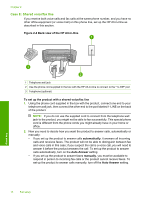
Chapter 2 To set up the product with voice mail 1. Using the phone cord supplied in the box with the product, connect one end to your telephone wall jack, then connect the other end to the port labeled 1-LINE on the back of the product. NOTE: If you do not use the supplied cord to connect from the telephone wall jack to the product, you might not be able to fax successfully. This special phone cord is different from the phone cords you might already have in your home or office. 2. Turn off the Auto Answer setting. 3. Run a fax test. You must be available to respond in person to incoming fax calls, or the product cannot receive faxes. Case G: Fax line shared with computer dial-up modem (no voice calls received) If you have a fax line on which you receive no voice calls, and you also have a computer dial-up modem connected on this line, set up the HP All-in-One as described in this section. Since your computer dial-up modem shares the phone line with the HP All-in-One, you will not be able to use both your modem and the HP All-in-One simultaneously. For example, you cannot use the HP All-in-One for faxing if you are using your computer dialup modem to send an e-mail or access the Internet. Figure 2-6 Back view of the HP All-in-One Fax setup 1 Telephone wall jack 2 Use the phone cord supplied in the box with the HP All-in-One to connect to the "1-LINE" port 3 Computer with modem To set up the product with a computer dial-up modem 1. Remove the white plug from the port labeled 2-EXT on the back of the product. 2. Find the phone cord that connects from the back of your computer (your computer dial-up modem) to a telephone wall jack. Disconnect the cord from the telephone wall jack and plug it into the port labeled 2-EXT on the back of the product. 16 Fax setup
-
 1
1 -
2
-
3
-
4
-
5
-
6
-
7
-
8
-
9
-
10
-
11
-
12
-
 13
13 -
 14
14 -
 15
15 -
 16
16 -
 17
17 -
 18
18 -
 19
19 -
 20
20 -
 21
21 -
 22
22 -
 23
23 -
24
-
25
-
26
-
27
-
28
-
29
-
30
-
31
-
32
-
33
-
34
-
35
-
36
-
37
-
38
-
39
-
40
-
41
-
42
-
43
-
44
-
45
-
46
-
47
-
48
-
49
-
50
-
51
-
52
-
53
-
54
-
55
-
56
-
57
-
58
-
59
-
60
-
61
-
62
-
63
 |
 |
