Gigabyte GA-F2A88X-D3HP User Manual - Page 62
Installing the SATA RAID/AHCI Driver and Operating System, A. Installing Windows
 |
View all Gigabyte GA-F2A88X-D3HP manuals
Add to My Manuals
Save this manual to your list of manuals |
Page 62 highlights
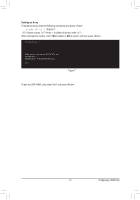
3-2 Installing the SATA RAID/AHCI Driver and Operating System With the correct BIOS settings, you are ready to install the operating system. A. Installing Windows (The following instructions use Windows 8.1 as the example operating system.) Step 1: You need to install the SATA RAID/AHCI driver during the OS installation. Use an alternative system to copy the SATA RAID/AHCI driver from the motherboard driver disk to a USB flash drive. Copy the SATA RAID/AHCI driver folder under BootDrv in the driver disk depending on your Windows version, for example: Windows 10 driver folder: "BootDrv\Hw10" Windows 8.1 driver folder: "BootDrv\Hw81" Windows 7 driver folder: "BootDrv\Hw7_A88" Step 2: Boot from the Windows setup disk and perform standard OS installation steps. When the screen requesting you to load the driver appears, select Browse. Step 3: Then browse to the USB flash drive and select the location of the driver, for example: Windows 10 64-bit RAID driver directory: "Hw10\RAID\x64" Windows 8.1 64-bit RAID driver directory: " Hw81\RAID\x64" Windows 7 32-bit RAID driver directory: "Hw7_A88\RAID\x86" Step 4: When a screen as shown in Figure 1 appears, select AMD-RAID Controller and click Next to load the driver and continue the OS installation. Figure 1 Configuring a RAID Set - 62 -
-
 1
1 -
2
-
3
-
4
-
5
-
6
-
7
-
8
-
9
-
10
-
11
-
12
-
13
-
14
-
15
-
16
-
17
-
18
-
19
-
20
-
21
-
22
-
23
-
24
-
25
-
26
-
27
-
28
-
29
-
30
-
31
-
32
-
33
-
34
-
35
-
36
-
37
-
38
-
39
-
40
-
41
-
42
-
43
-
44
-
45
-
46
-
47
-
48
-
49
-
50
-
51
-
52
-
53
-
54
-
55
-
56
-
 57
57 -
 58
58 -
 59
59 -
 60
60 -
 61
61 -
 62
62 -
 63
63 -
 64
64 -
 65
65 -
 66
66 -
 67
67 -
68
-
69
-
70
-
71
-
72
-
73
-
74
-
75
-
76
-
77
-
78
-
79
-
80
-
81
-
82
-
83
-
84
-
85
-
86
-
87
-
88
-
89
-
90
-
91
-
92
-
93
-
94
-
95
-
96
 |
 |
