GE PVX7300SJSS Use and Care Manual - Page 18
INSTALLATION PREPARATION, Installation Instructions
 |
View all GE PVX7300SJSS manuals
Add to My Manuals
Save this manual to your list of manuals |
Page 18 highlights
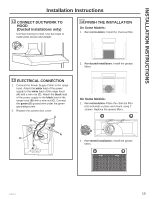
INSTALLATION PREPARATION Installation Instructions 8 FOR VENTED INSTALLATIONS On Some Models: Install with vented mode deflector part. 10 MOUNT THE UTC Place the hood onto the partially installed screws using the keyholes and slide the hood back into position. On Some Models: Install vented mode deflector part. 2 1 9 FEED IN WIRES Lift the hood into position and feed the house wiring through the wiring knockout. 11 SECURE HOOD Tighten the mounting screws. Be sure the screw heads are in the narrow neck of the keyhole slot. Mounting screw (4) Keyhole (4) 18 49-80783-3
-
 1
1 -
2
-
3
-
4
-
5
-
6
-
7
-
8
-
9
-
10
-
11
-
12
-
 13
13 -
 14
14 -
 15
15 -
 16
16 -
 17
17 -
 18
18 -
 19
19 -
 20
20 -
 21
21 -
 22
22 -
 23
23 -
24
-
25
-
26
-
27
-
28
-
29
-
30
-
31
-
32
-
33
-
34
-
35
-
36
-
37
-
38
-
39
-
40
-
41
-
42
-
43
-
44
-
45
-
46
-
47
-
48
 |
 |

18
49-80783-3
INSTALLATION PREPARATION
Installation Instructions
8
FOR VENTED INSTALLATIONS
On Some Models:
Install with vented mode deflector part.
On Some Models:
Install vented mode deflector part.
10
MOUNT THE UTC
Place the hood onto the partially installed
screws using the keyholes and slide the hood
back into position.
9
FEED IN WIRES
Lift the hood into position and feed the house
wiring through the wiring knockout.
1
2
11
SECURE HOOD
Tighten the mounting screws. Be sure the
screw heads are in the narrow neck of the
keyhole slot.
Keyhole (4)
Mounting
screw (4)