GE JD630SFSS Installation Instructions - Page 4
Warning - installation instructions
 |
View all GE JD630SFSS manuals
Add to My Manuals
Save this manual to your list of manuals |
Page 4 highlights
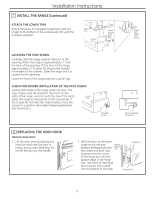
InstallationInstructions 3 WHEN INSTALLING RANGE IN COUNTERTOP CUT OUT TO THE WALL Ifthecounteropeningextendstothewalls,itwillrequiremaintopfillerkit(JXS66XX)orback-guardkit(JXS36XX, JXS39SS,orJXS32XX)toclosethegap.Refertothefillerorbackguardkitinstructionsforinstallationdetails. NOTE:Ifthecountertopisgreaterthan25"itwillshowagapbetweentheback-guardandwallorbetween fillerkitandthewall. Must be Flat Wall 25" 9/16" Must be Flat 9/16" 10-3/8" from countertop to anti-tip support WARNING Anadditionalanti-tipbracket supportmustbemountedto therearwallofthecutout . Theanti-tipbracketsupport istypicallya2x4pieceof Anti-Tip Support lumberscreweddirectlyinto thewallstuds.Theanti-tip bracketsupportmustbeable towithstand200lbsofforce attheengagementpoint . 29-15/16" Min. 30-1/16" Max. 4 PREPARING THE RANGE Remove Oven Door Doorremovalisnotarequirementforinstallationof theproductbutisanaddedconvenience.Toremove thedoor: 1.Opentheovendoorasfarasitwillgo. 2.Pushbothhingelockstowardthedoorframe totheunlockedposition.Thismayrequireaflat bladescrewdriver. Hinge Lock (Unlocked Position) 3.Placehandsonbothsidesofthe door,andclosethedoortothe removalposition.Thisishalfway betweenthebroilstopandfully closed. 4.Liftthedoorupandoutuntilthe hingearmscleartheslots. Hinge Slot Hinge Arm Hinge ClearsSlot NOTE: The oven door is very heavy. Be sure you have a firm grip before lifting the oven off the hinges. Use caution once the door is removed. Do not lay door on its handle. This could cause dents or scratches. 4
-
 1
1 -
 2
2 -
 3
3 -
 4
4 -
 5
5 -
 6
6 -
 7
7 -
 8
8 -
 9
9 -
 10
10 -
11
-
12
-
13
-
14
-
15
-
16
-
17
-
18
-
19
-
20
-
21
-
22
-
23
-
24
 |
 |
