Garmin Reactor 40 Kicker Autopilot Installation Instructions - Page 4
Installing the Steering Actuator - installation manual
 |
View all Garmin Reactor 40 Kicker Autopilot manuals
Add to My Manuals
Save this manual to your list of manuals |
Page 4 highlights
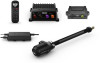
Power Cable Extensions If necessary, you can extend the power cable using the appropriate wire gauge for the length of the extension. Item Description Fuse Battery 9 ft. (2.7 m) no extension Item Description Splice 10 AWG (5.26 mm²) extension wire Fuse 8 in. (20.3 cm) Battery 8 in. (20.3 cm) Up to 15 ft. (4.6 m) Item Description Splice 6 AWG (13.29 mm²) extension wire Fuse 8 in. (20.3 cm) Battery 8 in. (20.3 cm) Up to 36 ft. (11 m) Installing the Steering Actuator 1 If necessary, remove the tiller lock on the motor (Removing the Tiller Lock on the Motor, page 4). 2 Prepare the tilt tube on the motor (Preparing the Tilt Tube, page 4). 3 Install the steering actuator in the tilt tube (Installing the Steering Actuator in the Tilt Tube, page 4). 4 Install the bracket on the motor and connect it to the steering actuator (Installing the Kicker Motor Bracket and Steering Linkage, page 5). Removing the Tiller Lock on the Motor Some motors have a tiller lock that allows you to lock the motor in a specified angle. These locking mechanisms are unnecessary when using this autopilot system, and may interfere with the installation or performance of the system. If your motor has a tiller lock, you should remove it before installing the steering actuator. 1 Determine if your motor has a tiller lock. 2 If necessary, see your motor manual or contact the manufacturer for instructions on removing the tiller lock. Preparing the Tilt Tube 1 Locate the tilt tube on your motor mount. Item Description Splice 8 AWG (8.36 mm²) extension wire Fuse 8 in. (20.3 cm) Battery 8 in. (20.3 cm) Up to 23 ft. (7 m) 4 2 Select an option: • If you do not plan to use the boat in salt water, proceed to the next step. • If you plan to use the boat in salt water, see the considerations for using this autopilot system in saltwater before proceeding to the next step (Saltwater Considerations, page 3). 3 If necessary, remove the caps on both ends of the tilt tube. 4 Using a long object such as a screwdriver, push a cloth or small sponge through the inside of the tilt tube to clean out loose rust or debris. Installing the Steering Actuator in the Tilt Tube 1 Apply white lithium grease to the push rod on the steering actuator. 2 Starting from either side, feed the steering actuator into the tilt tube.
-
 1
1 -
 2
2 -
 3
3 -
 4
4 -
 5
5 -
 6
6 -
 7
7 -
 8
8 -
 9
9 -
 10
10
 |
 |
