Frigidaire FFEW3025PB Complete Owner's Guide - Page 8
Oven Controls, Oven Control Features, Setting the Clock
 |
View all Frigidaire FFEW3025PB manuals
Add to My Manuals
Save this manual to your list of manuals |
Page 8 highlights
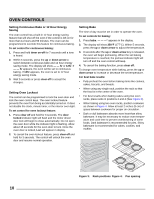
OVEN CONTROLS Oven Control Features 1. Bake - Use to enter normal baking mode temperature. 2. Broil - Use to select the variable broil function. 3. Clean -Use to select the self-cleaning cycle. 4. Keep Warm - Use to set the Keep Warm feature. 5. Bake Time - Use to enter the length of baking time. 6. Start Time - Use to set the desired start time for baking. Can be used with bake time to program a delayed bake cycle. 7. Up Arrow - Use along with the function keys to select oven temperature, time of day and minute timer. 8. Down Arrow - Use along with the other functions to select oven temperature, time of day and minute timer. 9. Clock - Use to set the time of day. 10. Timer On-Off - Use to set or cancel the minute timer. The minute timer does not start or stop cooking. 11. Oven Interior Light - Use to turn oven interior light ON and OFF. 12. Clear - Use to stop cooking or clear any function previously entered except the time of day and minute timer. 13. Oven, Preheat, and Lock lights- The oven light indicates that the oven is functioning, and it will go on and off throughout the cycle. The preheat light will glow when the oven is first set to operate or if the desired temperature is reset higher than the actual oven temperature. The door locked light will flash until the door locks when the self-clean cycle is in use. It glows constantly after the door locks. 14. Feature indicator lights- These lights show which feature is in use. Setting the Clock When the oven is first plugged in, or when the power supply to the appliance has been interrupted, the display will flash 12:00. To set the clock: 1. Press clock once and release. 2. Within 5 seconds push and hold the up or down arrow until the correct time of day appears in the display. 3. Press clock again to accept the new time of day. The clock will automatically set to the selected time of day if clock is not pressed. NOTE • Read the instructions carefully before using the oven. For satisfactory use of your oven, become familiar with the various features and functions of the oven as described in this manual. • The graphics on your appliance may not appear exactly as shown. This does not affect operation. NOTE • Oven functions will not work if the time of day clock is not set. When using the delay start feature make sure the clock is set to the correct time of day. • The clock cannot be set or changed when the oven is in use. 8
-
 1
1 -
2
-
 3
3 -
 4
4 -
 5
5 -
 6
6 -
 7
7 -
 8
8 -
 9
9 -
 10
10 -
 11
11 -
 12
12 -
 13
13 -
14
-
15
-
16
-
17
-
18
-
19
-
20
-
21
 |
 |
