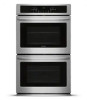
Frigidaire FFET2726TS Complete Owner s Guide - Page 23
Setting a Delay Start Self Clean Cycle, Restoring Factory Control Settings, START. door Loc
 |
View all Frigidaire FFET2726TS manuals
Add to My Manuals
Save this manual to your list of manuals |
Page 23 highlights
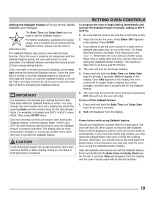
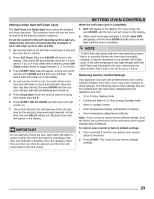
Setting a Delay Start Self Clean Cycle The Self Clean and Delay Start keys control the delayed self-clean operation. The automatic timer will turn the oven on and off at the time you select in advance. To set the control for the self cleaning cycle to start at a delayed time and shut off automatically (example: 3 hour self clean cycle to start at 4:30): 1. Be sure the clock is set with the correct time of day and the oven door is closed. 2. Press Self Clean. CLn and 3:00 HR will show in the display. The control will automatically clean for a 3 hour period. If a 2 or 4 hour clean time is desired, press Self Clean multiple times to toggle between 2, 3, or 4 hours. 3. Press START. door Loc will appear, a beep will sound, and the word DOOR and the lock icon will flash. The letters CLn will remain on in the display. 4. As soon as the control is set, the motor driven oven door lock will begin to close automatically. Once the door has been locked, the word DOOR and the lock icon indicator light will quit flashing and remain on. 5. Press Delay Start. Enter the desired start time using the number keys 4 3 0. 6. Press START. DELAY, DOOR, and the lock icons will remain on. 7. The control will start the self-cleaning at the set start time for the period of time previously selected. At that time, the icon DELAY will go out; CLn and oven icon will appear in the display. IMPORTANT Do not attempt to force the door open while self clean is active or when the motor door latch is unlocking or the door lock indicator is flashing. Once the display is clear, the oven door can then be opened, and the timer will revert back to the time of day. SETTING OVEN CONTROLS When the self-clean cycle is completed: 1. HOT will appear in the display. The time of day, the word DOOR, and the lock icon will remain in the display. 2. When oven cools approximately 1 HOUR, door OPn will appear, and the word DOOR and the lock icon will flash until the door is unlocked. NOTE If Self Clean was active and then interrupted by a power failure or cancelled before the oven was thoroughly cleaned, it may be necessary to run another Self Clean cycle. If the oven temperature was high enough when the Self Clean was interrupted, the oven control may not allow another Self Clean to be set for up to 4 hours. Restoring Factory Control Settings Your appliance was built with predetermined oven control settings (default). Over time, users may make changes to these settings. The following options have settings that can be modified and may have been changed since the appliance was new: • 12 or 24 hour display mode • Continuous Bake or 12 Hour Energy Savings mode • Silent or audible control • Oven temperature display (Fahrenheit or Celsius) • Oven temperature adjustments (offsets) Note: If you choose to restore factory default settings, all of the above user preferences will be restored to their original settings (factory default). To restore oven control to factory default settings: 1. Press and hold 7 until the acceptance tone sounds (about 6 seconds) 2. Press START. The control is now reset to default settings. 23
-
 1
1 -
2
-
3
-
4
-
5
-
6
-
7
-
8
-
9
-
10
-
11
-
12
-
13
-
14
-
15
-
16
-
17
-
 18
18 -
 19
19 -
 20
20 -
 21
21 -
 22
22 -
 23
23 -
 24
24 -
 25
25 -
 26
26 -
 27
27 -
 28
28 -
29
-
30
-
31
-
32
 |
 |
